#6 James Perkins of JP’s FX Creations Thought I’d mix things up a bit and do a little autobiography on myself to add to the list–just a bit arrogant to throw meRead More…
Best Web Hosting to Monetize Your Blog It’s time to take “a leap of faith” and “make the plunge” into the exciting world of blogging. You’ve been thinking about it for awhileRead More…
#5 Erica Melisandre is Red Enchantress Cosplay I know what you’re thinking…”that can’t possibly be her last name or is it?” No it isn’t, as I was gullible enough to ask–it’s herRead More…
T-1000 TERMINATOR Cosplay from Terminator 2 Judgement Day side by side comparison
Becoming The T-1000 From Terminator 2: Judgement Day
————————————————————————————————————————————————–
The plan to become Robert Patrick’s advanced Terminator from Terminator 2: Judgement Day came from my desire to do a shared photoshoot with a Featured Cosplayer I was working on here on my website. The cosplayer Justin Grubb of Turbo Time Cosplay does a terrific Terminator and the T-1000 was the perfect character to go along side his. I wanted to think of a cosplay that wouldn’t show my age, or show my hair that I’m trying to grow out, and of course one that I would enjoy doing as well. So the motorcycle cop version of the T-1000 with the helmet and mirrored shades was a brilliant and fun one to do. [Interesting fact: my father-in-law’s name is Robert Patrick].
I was also learning an important aspect of Cosplay that Justin does so well, and that’s the research and sourcing part of building a character to portray. I had watched the movie again and again, googled images and read several forums on this very character to find everything I needed. There was some building and crafting I had to do which is my specialty which I’ll be showing you throughout this article. Thanks to Justin of Turbo Time Cosplay for all his help and for just being and all around “Cool Cat” to hang with.
Acquiring and Modifying the Helmet
Second step, masking to apply the black
The first thing that I immediately started to research and try to acquire was the motorcycle helmet that really makes or breaks the appearance of the character. And after several attempts at possibly finding the exact one for sale I ended up purchasing a motorcycle helmet that I was going to have to seriously modify. The driving force to this decision (and most decisions for this cosplay) was the budget and trying to keep it as low as possible. So here is where you can purchase a good helmet cheap to modify.
The primary modification is of course the paint job to give it the screen accurate Los Angeles Highway Patrol uniform approved appearance. I work for a sign company so I had access to the good sign and automotive paint and tools to make it happen. I began by removing the visor and then sanded the existing finish with 220 grit sandpaper for the new paint to have “tooth” to adhere good. I masked off the inside of the helmet and painted the whole outer shell with two coats of white. After about 2 hours for the paint to dry and cure, I taped off the top of the helmet and prepared then painted two coats of black to the bottom half. I then removed the tape on the top covering the white and sprayed a satin clear coat over the whole helmet. I chose satin for photography reasons and not a high gloss sheen as you see with most helmets.
One serious obstacle with the helmet was trying to acquire a police helmet badge to make it official. It wasn’t long until I gave up the search, so I used my resources from work again and had one printed out of vinyl from a high resolution photo I found online.
See gallery below of the WIP for the helmet:
Motorcycle helmet needing an overhaul to make it Terminator worthy
First step, applying the white
Second step, masking to apply the black
Third step, applying the black
Fourth step, visor detail and adding the LA Police helmet badge vinyl decal
Guns and Belt Accessories
To move the progress along I was always on the hunt to find and order pieces to the costume that were ready to wear and finished upon receiving like:
These were all ready to go except I had to modify the rifle to look like an MPK-5 submachine gun that the T-1000 is seen using a lot as the motorcycle cop. See pics below as you’ll see I had to cut the barrel, eliminate the stock and add a longer banana clip mag that I cut out of 3/4″ black sintra PVC board:
Airsoft Rifle to be converted to the T-1000's MP5K submachine gun
Removing the parts for rifle conversion to the MPK5
Finished MPK5 rifle conversion for the T-1000 cosplay
.
.
Making the Police Scanner Radio
This was simple and fun as they were all parts from a surplus electronics store and I was again imploring my new found technique of printing on vinyl to achieve an impossible item in two dimensional fashion and succeeding. I also took the belt clip off of an old large tape measure and applied it to the back middle of the finished prop for functional belt attachment. See pics below.
Random parts and vinyl print to create a police scanner radio for the T-1000
WIP police scanner radio prop
Faux police scanner prop for the T-1000
.
.
The Infamous Liquid Metal Bullet Wound Puddles
This was the best part of the whole job, other than wearing the finished costume at a Con, was the making of the Bullet wounds that are so prevalent throughout the film as the T-1000 gets shot.
My process was the same process I almost always do something with a specific shape and that’s sculpting what I need out of clay, making a silicone mold and then casting it out of a desired plastic. Having a mold means I can make however many bullet wounds I desire. I ended up with three different sizes and made about three of each size.
When casting these pieces out of a liquid substance in the mold, right before the material would harden, I dropped a large zinc plated washer that would be a permanent part of the back surface of the bullet hole. This was so I had an iron surface that a good strong earth magnet could be attracted to as that was how I was to attach them to the patrol jacket. I therefore, had as many options for bullet placement as I wanted.
Liquid metal bullet holes sculpting out of oil based clay
WIP clay sculpting T-1000 bullet holes
Silicone poor molding the T-1000 liquid metal bullet holes
Finished silicone mold of clay sculpted bullet holes
Bondo/resin mix of the T-1000 liquid metal bullet holes from silicone mold, Large washers were added to the poor to create magnetic attachment
Chrome spray painted liquid metal bullet hole
Test fitting bullet holes on jacket using magnets
.
.
Police Uniform: Jacket, Pants, and Boots
What makes the character authentic is the uniform and having him be a believable police officer. All these parts of the jacket (including the patches), pants and boots were all purchases I made separately:
Jacket–an eBay find of a used thinsulate 3M Duty jacket
The only thing I had to do was to put all the patches on the jacket shoulders and I used hot glue instead of sewing which worked really well with the texture of the jacket for maximum adhesion.
WIP Motorcycle cop uniform jacket
Patch placement for the motorcycle cop uniform jacket
.
.
Left Arm Spike Protrusion
Another important characteristic of the T-1000 terminator is his ability to take any shape, which includes turning any part of his body into a weapon, so I wanted to repeat the left arm spike he makes to stab a truck driver who was in the wrong place at the wrong time.
I thankfully, of course, used my resources made available to me from my place of work at Vital Signs of Orlando, Inc. We had some reflective, mirrored plastic material left over from another job and I had a file made to have 4 pieces cut from the CNC router table to then be glued together and make a four sided spike. See pics below of the process:
Arm spike pieces for the T-1000 cut using a CNC router table
Mirrored plastic pieces for the arm spike of the T-1000
Jig for gluing the T-1000 spike together
Finished spike for the T-1000 terminator
Test fitting the T-1000 arm spike
Joining additions to the T-1000 spike (foil tape)
.
.
Ready to Have Fun
Costume complete, full layout
After putting it all together I was ready to test fit and schedule a photoshoot with Turbo Time Cosplay and photographer BriLan Imagery. It took me a total of three months from the time I decided to do this cosplay to when we had our photoshoot to incorporate into the article I published on Justin. I always seemed to be waiting for something to arrive and I spent a lot of time on eBay, not just for the items I ordered, but to sell some of my nuggets from the past to be able to afford everything I needed. It was a never ending cycle it seemed and I still haven’t received my LAPD Police badge from China which is still stuck in customs. I ended up borrowing Justin’s from his Jack Slater Last Action Hero Cosplay for our photoshoot.
T-1000 Motorcycle Cop by me; photo by BriLan Imagery
T-1000 head shot and shooting pose
Robert Patrick's T-1000 Motorcycle Cop from Terminator 2: Judgement Day Cosplayed by me: photo by BriLan Imagery
Liquid metal comin at ya, T-1000 Cosplay; photo by BriLan Imagery
Battle damaged T-1000 Terminator; photo by BriLan Imagery
T-1000 dead or alive?
Liquid metal evidence for the T-1000 Terminator
"Say, that's a nice bike..." T-1000 Cosplay by me; photo and edit by BriLan Imagery
Classic scene of the frozen T-1000 from liquid Nitrogen; Photographed and edited by BriLan Imagery
Two terminators going at it, Justin and I as the T-800 and T-1000; photo and edit by BriLan Imagery
Got each other in their sites; photo by BriLan Imagery
T-1000 Cosplay, even without an automatic rifle, he's still a weapon; photo by BriLan Imagery
T-1000 Beat Cop Austin Cosplay; photo and edit by BriLan Imagery
.
.
Taking The T-1000 To MegaCon Orlando 2019
In the presence of the best @alysontabbitha always delivers…The T-1000 is humbled
I was pleasantly surprised on how well my motorcycle cop terminator was received by all those who attended MegaCon on the Saturday (the busiest day) at the Orange County Convention Center. Maybe it’s because I was the only one, but I think it is a rare cosplay and the memory of the T-1000 is seared in many peoples minds as it was a revolutionary film technique at the time and still holds up today. I was stopped everywhere I went and kept hearing “T-1000…can I get a picture with you?” I, of course, happily obliged and even got some pictures together with my camera phone with some of my favorite Cosplayers. It’s a tradition of mine to get a picture with the Sweet and Talented Alyson Tabbitha whenever she makes a Guest appearance at a local convention.
One draw back to this costume is the heat generated by wearing a coat, helmet and knee high boots (which happens to be a common problem with about any cosplay). Walking around all day with tons of other bodies close by can be an exhausting experience dressed up in a full patrol uniform. It also didn’t help wearing sunglasses indoors as my vision became somewhat hindered. The sacrifices we make for the love of the craft.
The Terminator might as well just go home cause it's over before it even begins...@alysontabbitha 's Wonder Woman is just Awesome...period
Yeah, the Captain would definitely win...she's already better looking; Captain Marvel by Toria of @torifid
The T-1000 Invades Disney, but Tink has the upper hand with that smile at MegaCon 2019; original Tinkerbell design by @colossalsmidgen
Proxima Midnight takes on the T-1000 at MegaCon Orlando 2019; Proxima Midnight by Damaris Degen of @mystiquesworldofcosplay
Gamora meets the T-1000 Terminator at MegaCon Orlando 2019; Gamora by McKenzie Rae of @texthemess
Two Sci-Fi Legends Collide Rey VS The Terminator at MegaCon Orlando 2019; Rey is Meredith of @ghostprincesscosplay
Ms Bombshell Captain America and the T-1000 posing together at MegaCon Orlando 2019; Retro-style Captain America by Ellie Villafane of @missrockersupreme
Red carpet treatment for the T-1000 at MegaCon Orlando 2019
One of my primary reasons for starting this page of Featured Cosplayers is to learn how I can become a good Cosplayer myself and I’m not getting any better without finding out what makes this next guy successful. He is Justin Grubb of Turbo Time Cosplay. He is another fortunate find that happens to be local for me and connected to some of my past chosen Cosplayers I’ve come to know. As soon as I checked out his profile and many examples of his work, I knew immediately I needed to get in on his secrets.
Justin at the 40th Anniversary of John Carpenter’s Halloween in Pasadena, CA.
Well, not really secrets because he freely shared any knowledge that I was curious about with how he did any of his cosplays. He has a wonderfully “fresh” approach to Cosplay with his humor, his focus on research for the character he wants to portray, and the “no care” attitude towards popularity of the Cosplay and/or the obscurity and recognition. Another words, he’s gonna do what he wants to do and love…period.
I always make it a point to meet and get to know my Cosplayers before I publish an article. I could have easily just emailed and messaged questions and that could be alright, but I’m hoping to give the reader a better experience with reading about someone I like a lot. This is a bonus for me as I’m making new friends and one thing I’ve learned for sure is that the Cosplay community’s primary focus is the support given to each other and the friendships made.
Justin is terrific. He agreed to meet with me during a somewhat low time in his life, as he just recently lost his cat Binx to a mystery disease, but we had a great encounter sharing both of our passions with Cosplay and what makes us tick. Three hours at an Applebee’s booth with two fellas swapping Con stories and tricks of the trade produced a wealth of knowledge that became a story to be told in itself, here, too.
Laugh Out Loud Funny
The absolute characterization I noticed first that drew me to him was the humor and his ability to make me laugh immediately at several of his Cosplays.His most recognizable character, and he’ll be the first to tell you, is Biff Tannen from Back to the Futurewhere he has done every version of Biff from all three films of the trilogy. They are hysterical! He captures all the mannerisms, facial expressions and poses that are synonymous to Biff. A very rare character to be cosplayed, but Justin pulls it off so well, it’s his signature role or the one probably talked about the most from his work.
While he was at the 40th anniversary convention in California for John Carpenter’s Halloween, Justin took advantage and also got to check out some of the film locations from Back to the Future and was resourceful enough to make this great video montage of Biff:
Some other funny characters that Justin has cosplayed I’ll be showing you later down the page are: Howard from Jingle All the Way, Marv from Home Alone, more Biff, Fletcher from Liar Liar, and Ted from Bill and Ted just to name a few.
Research is the Key, and Even More Research, Too
Justin finds a more screen accurate material to improve his “alternate timeline Biff” Cosplay
Justin’s specialty as a Cosmaker is all the research he does to satisfy his obsessive compulsive approach to getting a particular Cosplay screen accurate. Everything from all the shopping and artist websites he’ll browse, to watching scenes over and over again of a movie or show, visual reference, comparing what others have done, to even contacting costume designers from the actual movie his character is from like he did for Back to the Future II’s costume designer Joanna Johnston. He was looking for the right material for alternate reality timeline Biff’s robe. She didn’t seem to remember as the movie is 30 years old, but she did seam to approve what he came up with, only later he managed to find a better material so he’ll be making a new robe for MegaCon Orlando 2019 as all the main cast members will be there from the movie.
Cosplay isn’t just the pictures you see on a particular Cosplayer’s profile, but I would submit to you, and Justin would agree, that the “play” in the word cosplay is one of the most important parts about doing the character. Justin has several videos on his profile and even has a YouTube channel where he takes on each of his character’s mannerisms, accents, body language, and personalities. This is where I believe he shines the most as where the countless reps of practicing Arnold Schwarzenegger‘s accent and Tom Wilson‘s voice and facial expressions pays off. I remember asking him how he can keep a straight face when doing the funny parts of his character’s he portrays and he responded with, “I’ve said those quotes a million times, lol…
Justin’s Celebrity Photo-ops
My favorite stories Justin talked with me about, when getting to know him, are his many encounters with the celebrities he idolizes at the conventions he attends where he can get an autograph and picture with them. And let me say not just any picture–Justin makes it a point to have the photo-op an experience he’ll never forget and that the targeted celerity will always remember, too. Like when Justin got the chance to meet Mark Hamill who is the legendary voice actor for The Joker on Batman the Animated Series. Mark Hamill, as you know, is also Luke Skywalker in Star Wars and he was coming to Florida for the Star Wars Celebration Convention. Justin took advantage and even though every cosplayer at the con was in Star Wars attire Justin was the only Joker Cosplayer to surprise Mark with. He even had the chattering teeth prop to have Mark hold for the pic. Get a load of the several pics below of the photo-ops Turbo Time Cosplay gets with the chosen celebrities, and don’t spit out your drink looking through them, lol.
Griff and Biff! Justin gets to meet the real Biff (Tom F. Wilson) at MegaCon 2017 and scores this epic pic in the DeLorean Time Machine
Griff's gang posing with the Mayor...Justin's Griff Tannen Cosplay meeting up with cast members of Back to the Future II. Ricky Dean Logan, Darlene Vogel and Don Fullilove at Florida PopCon
One of Justin's favorite pictures as he has a photo-op with Michael Biehn (Kyle Reese) for his Terminator Cosplay from Tampa Bay Comicon 2017. Tech Noir background edited in by Justin.
Group photo op with Robert Patrick for a collaborated Terminator Cosplay. Kyle Reese by @fictionrealitycosplay and Sara Connor by @once_upon_a_khaleesi_cosplay
Reenacting a behind the scenes photo from Halloween's 40th anniversary celebration with the original actor Nick Castle who played Michael Myers
Chumming it up with Cinematographer Dean Cundry ASC (for Back to the Future, Halloween and Jurassic Park trilogies.
Justin's Michael Myers' photo-op with some of the original cast and crew of John Carpenter's Halloween fortieth year celebration in Pasadena, CA
Fun with P.J. Soles at Spooky Empire 2017; Halloween Cosplay with Halloween original cast member
Justin's Joker crashes the Star Wars Celebration Con to meet the legendary Mark Hamill as he honors Mark's work as the voice of the Joker from Batman the Animated Series.
The Joker vs Kevin Conroy (Batman) from Batman the Animated Series voice actor, MegaCon 2016. Background edited by Justin.
Gotham Cosplay with a bonus cast member photo-op. Justin's Jerome from Gotham gets a photo with Alfred (Sean Pertwee) and young Bruce Wayne (David Mazouz) at MegaCon 2018
The Claw battle from Liar Liar with Justin's Fletcher Reed Cosplay vs Cary Elwes at Tampa Bay ComicCon 2018
.
So let’s begin showing off Justin’s gallery of photos to many of his favorite characters he’s done…
Turbo Time Cosplay Gallery of Photos
Biff Tannen From Back to the Future Trilogy
Jumpsuit, car waxing biff outside the McFly house film location
Biff in the Time Machine made by DeLorean Time Machines
Traditional side by side comparison for Biff from Back to the Future, exact same spot both are standing 29 years apart.
Biff can go anywhere Justin wants to take him, including Dapper Day at Disney's Magic Kingdom
"What are you lookin at Butthead..." Biff Tannen Cosplay
Altered timeline Biff from Back to the Future part 2; photo by TKirk Photos, edits by Justin
Griff Tannen, Biff's son from Back to the future part 2 Cosplay
"Batter up" Griff Tannen from the future in Back to the Future II; photo by Geek World Order
The Terminator T-800 Cosplay
T-800 Cosplay from The Terminator; photo by BriLan Imagery
Terminator Cosplay of the T-800; photo by BriLan Imagery
Arnold's Terminator cosplayed and photo edited by Justin; original photo by TKirk Photos
Tech Noir Terminator Cosplay; Photo by TKirk Photos edited by Justin
Terminator 2 Judgement Day Cosplay of the T-800 for Spooky Empire spring 2019
More Arnold Schwarzenegger Character Cosplays
Last Action Hero Cosplay of Jack Slater, Golden Ticket and all...Tampa Bay ComicCon 2018
Justin outside the actual theatre where Last Actin Hero's Pandora set was filmed inside.
Cosplay Film Location at The Hyatt Long Beach for The Last Action Hero
Jingle All the Way Cosplay; Photographed by BriLan Imagery
Howard Langston Cosplay of Jingle All the Way; Photographed by TKirk Photos
"I'm gonna deck your halls, bub." Jingle All the Way; Photo by Victorieux Photography
Funny shot taken at Holiday Matsuri 2018 of Howard Langston Cosplay from Jingle All the Way vs Santa; Photographed by TKirk Photos
Michael Myers From John Carpenter’s Halloween
Michael Myers Halloween Cosplay; photo by BriLan Imagery
Michael Myers Cosplay On Location outside the Doyle house West Hollywood, California
Michael Myers unmasked; photo and edit by BriLan Iagery
Michael Myers makin' the moves on Ginger Curry of @gingercurrycosplay; photo and edit by BriLan imagery
In-and-out of Cosplay, Turbo Time Cosplay does his Michael Myers from John Carpenter's Halloween; photo and edit by BriLan Imagery
Additional Horror Themed Cosplays
Jack Torrance Cosplay from The Shining; photo and edit by BriLan Imagery
Turbo Time Cosplay does Jack Torrance from The Shining
"Danny...Danny boy!?" The Shining; photo by TKirk Photos edited by Justin
"Here's Johnny" The Shining 1980, Jack Torrance Cosplay; photographed by TKirk Photos
Freddy Krueger Cosplay with @kanina.lady as the victim; photo and edit by BriLan Imagery
Phantom of the Opera Cosplay; Photographed by TKirk Photos
Phantom of the Opera playing his song
The Phantom of the Opera Musical Cosplay; photographed by TKirk Photos
DC’s The Joker and Gotham’s Jerome
"The Clown Prince of Crime": T Kirk Photos picture with edits by Justin himself
"BANG" [insert Joker laugh here]; photo by CPR Digital Photography at Tampa Bay Comic Con 2018
The Joker, Gangster Era
DC's Classic Joker Gangster Era Cosplay, 1940's Bombshell; photo by T Kirk Photos
Terrific side by side cosplay comparison of Jerome from Gotham and Justin's Cosplay
Jerome Cosplay from Gotham on FOX, picture from MegaCon Tampa 2018
Staple Faced Jerome from one of Justin's favorite shows, Gotham on FOX as it earns a fifth season
Jerome from Gotham Cosplay; photo by Ethereal Visions Studio at MegaCon Orlando 2017
Justin’s Niche (Rare, Cool) Cosplays
Patrick Bateman Cosplay from American Psycho
Johnny from The Room Cosplay (Tommy Wiseau written, directed, and starred in); photo by Joel Green of @onlineinternet
Mike Enslin Cosplay from 1408 played by John Cusack; photographed by TKirk Photos with door edit by Justin
Andy Dufresne Cosplay from Steven King's Shawshank Redemption; photographed by TKirk Photos with edits by Justin
Nathan Drake Uncharted video game Cosplay; photo by Ethereal Visions Studio
Kilgrave Cosplay from Jessica Jones on Netflix played by David Tennant; photographed by TKirk Photos
Grand Theft Auto Vice City Video Game Cosplay of Tommy Vercetti
Group and Collaborated Cosplays
Cosplay doesn’t get any better than this…having friends with the same zeal for a story to be told through Cosplay of some of your favorite fandoms. The Con experience is elevated and the fun translates to immediately thinking and planning for the next collaboration to be done. It’s also a way to share each others talents to everyone else. I’m grateful cause this is the very thing that led me to Justin, in the first place, through Pepe’s involvement with The Mummy Group Cosplay they did together.
The Mummy Group Cosplay players: Imhotep (@asaomarcosplay), Anucksunamun (@once_upon_a_khaleesi_cosplay), Rick O'Connell (@turbo_time_cosplay), Evie (@red_enchantress_cosplay) Jonathan (@fictionalrealitycosplay) and Ardeth Bay (@khal_of_atlantis); photo by All Seeing Eye Photography (@all_seeing_eye_photography)
The Last of Us Cosplay collaboration with Ashe Frost of @ashefrosty as Ellie; Photo by BriLan Imagery
The Phantom with his Christine by @vronniep
The Terminator Clan: T2 Sarah Connor (@once_upon_a_khaleesi_cosplay), Kyle Reese (@fictionalrealitycosplay), Sarah Connor (@red_enchantress_cosplay), T-800 (@turbo_time_cosplay); photographed by TKirk Photos at Spooky Empire 2018
Collaborated Last Action Hero Cosplay with Christian Wingate of @fictionalrealitycosplay as Benedict
Justin's Gangster Joker with Flapper Harley Quinn by Angel Of Dorkness Cosplay; photographed by TKirk Photos from Tampa Bay ComicCon 2018
Buffy Fest 2017 Group Cosplay: Red Enchantress Cosplay as Buffy, Christian Wingate of @fictionalrealitycosplay as Spike, Ashley Bray of @sketch_deviant_cosplay as Willow, Amanda Short of @once_upon_a_khaleesi_cosplay as Faith, Asaomar Cosplay as a vampire, and of course Justin as a bearded Angelus/vampire
Game of Thrones Group Cosplay, Asaomar Cosplay as Varys, Red Enchantress Cosplay as Melisandre and Justin as Lord Baelish
Alan Grant and Ellie Sattler (Alissa of From the Ashes Cosplay @ladyashexii) Jurassic Park Cosplay collaboration; photo by Kyle Roman of Dead FX Productions
Angel from Buffy the Vampire Slayer Cosplay with Red Enchantress Cosplay as Buffy
The Mummy Reenactment collaboration with Red Enchantress Cosplay; photographed by TKirk photos with edits by Justin
Out Of Cosplay
Justin in his element
With a strong passion for Cosplay that Justin has, it seemed that almost everything he enjoys doing out of cosplay is, well, cosplay related. Like his absolute love for movies, collecting action figures and even building dioramas with them, collecting movie props, shooting videos and playing video games. I’m almost always guaranteed to connect with my new acquaintances with the same interests through the fandom culture. I love a lot of the same movies and characters he does, as well.
When pinpointing some of his favorites he gave me ‘ties’ for first place in movies and video games. For his favorite movie he says both Back to the Future 2 and the original 1978 Halloween, which he justifies as they are so different yet so good. And favorite video game is split three ways between Grand Theft Auto Vice City, Batman Arkham series, and The Uncharted series. He’s proved all these are his favorites as he’s done cosplays for every one of them listed.
Something else impressive he does, that is cosplay related, but I consider a non-cosplay talent is his ability to work with Photoshop and edit pictures to add to the composition and theme or mood that is being told through the photograph. Several examples can be seen in some of his photos that I’ve added to his gallery above, like his Joker pic in front of the “added” Arkham Asylum background and his photo-op with Michael Biehn in front of an edited Tech Noir club sign from the original Terminator. I also asked if he could play around with one of my Superman photos from my outdoor shoot with my wife as Lois Lane and what he did was incredible! See the photo of the original and then the edits below:
Superman and Lois Lane Cosplay, husband and wife team, photographer Melissa Blyth
Justin's edited photo of my Superman Cosplay with my wife as Lois Lane.
Rain added to edited photo
He does have a few other enjoyable activities he partakes with his friends like mini golf, bowling, board games, make dinners, go to comedy clubs and just hanging out. I did reach out to one of his friends and they repeated to me these same activities that they like to do together.
What makes up most of his life right now is his job working at the PHSC state college store and his schooling as he will be graduating December 2019 from USF with a degree in Mass Communications, focusing in Advertising. I can already, in my mind, see how this might work well with his Cosplay life and I’m sure he thinks about it, too. I hope to pick his brain on what I could do to advance my work with that type of knowledge he has obtained. I’ll have to bribe him over his favorite food of Hawaiian pizza or maybe chicken cordon bleu if it’s after he graduates and becomes a professional, HA!
“It’s Turbo Time”
Little Finger is scheming something up in his mind…Lord Baelish Cosplay from Game of Thrones; photographed by TKirk photos
A guaranteed question I ask every time is how did one come up with their alias or Cosplay title name. I like trying to guess first and with Justin I thought it was pretty straight forward, but I was only partially right. I assumed the “Time” portion to his name was a reference to the time travel within Back to the Future with his Biff and The Terminator with his T-800. However, he told me it is from the quote “it’s Turbo Time” from Jingle All the Way when Arnold (Howard) is in the life size Turbo Man suite and is getting ready to take off in the jet pack to save his son–a funny scene from his favorite Christmas movie. Turbo Time is also the name of the arcade of Turbo, the villain from Wreck it Ralph. He recently re-designed his logo to show much of what he is passionate about as it’s written in the Back to the Future font along with the clock tower face from BTTF carved on a pumpkin representing Halloween, as you may recall from above is both his favorite movies.
Turbo Time Cosplay Logo
When doing these write ups on my chosen Cosplayers I feature, I also like to pick a favorite Cosplay of theirs after studying their profile for awhile. It was hard with Justin because what drew me to his profile was his Biff cosplays, but I think I’m going with Lord Baelish from Game of Thrones that he does. He has an uncanny appearance already when he is donning the robe and mustache. He also does the perfect smirk on his face when posing as Little Finger and when I told him, without skipping a beat he said it’s already a natural look he does anyway, lol. It turns out that he won a cosplay contest with his Little Finger in a large Game of Thrones group cosplay for MegaCon Tampa 2017. Another contest he won recently was at the Saved By the Ball: ’90s Party at Ybor City Ritz as Alan Grant and his friend as John Hammond from Jurassic Park.
Another important question that I want to include to give you an insight of the person behind the façade is “Why do you love Cosplay, and what does it mean to you…?” Here is what Justin replied, “It started off as a way for me to connect to and show my love for movies and characters I like. Movies are like my favorite thing and I thought about being an actor when i was younger. I always loved Halloween (aside from it being my favorite holiday and time of year and Halloween Horror Nights at Universal Studios and pumpkin spice and scary movies etc) I always loved dressing up. Sometimes It was hard for me to find a place to go with friends and be dressed up, and I changed my mind for what costume I was wearing like 10x throughout the year. It was like I said a way for me to have a chance to be one of my favorite characters and act out some of my favorite movie lines and scenes. So in 2016 megacon came around and they had Christopher lloyd as a guest. Back to the Future being my favorite, that brought me to my first convention and I entered the world of cosplay. Suddenly, other exclusivities aside, I found out that it could be
Halloween all year. I was immediately hooked. Now, cosplay means so much more than that as over the small amount of time I’ve been doing this, comparatively anyway, I’ve met so many great people and have made so many wonderful friends because of it. Friends that I look forward to seeing every con and friends that I hang out with almost every weekend. Cons have become less about the con itself, and more a reunion to seeing everyone I haven’t seen since the last one. And I’m lucky enough to make new ones just about every time. Another aspect of that is not just making a new friend, but collaborating with them in a duo or group cosplay. Feeding off each other and getting hype over a shared love of something just takes it to the next level. I absolutely love this world.”
Our Shared Photoshoot With Premier Cosplay Photographer BriLan Imagery
Pre-photoshoot selfie Terminator 2 Cosplay, Me as the T-1000 motorcycle cop, Justin as Arnold's T-800 and photographer Brian Lansangan of BriLan Imagery
Behind the scenes Terminator 2 Cosplay photoshoot
One in a million shots of the Galleria scene Judgement Day; Photo by BriLan Imagery
T-800 protector; photo by BriLan imagery
"Get Down" T-800 by Turbo Time Cosplay; Photo by BriLan Imagery
The Terminator in Judgement Day and his ride; photo and edit composite by BriLan Imagery
"Say, that's a nice bike..." T-1000 Cosplay by me; photo and edit by BriLan Imagery
Liquid metal bullet holes and spike of the T-1000 Cosplay; photo by BriLan Imagery
T-1000 Motorcycle Cop by me; photo by BriLan Imagery
T-1000 dead or alive?
Classic scene of the frozen T-1000 from liquid Nitrogen; Photographed and edited by BriLan Imagery
Got each other in their sites; photo by BriLan Imagery
Two terminators going at it, Justin and I as the T-800 and T-1000; photo and edit by BriLan Imagery
.
Here’s a little treat for those who stayed reading till the end as I put together some more of Turbo Time Cosplay’s funniest pics…Enjoy!
Jumanji VS Wonder Woman; hilarious photo-op with the Great Alyson Tabbitha (@alysontabbitha)
Jessica Nigri photo-op--Lucky Griff!
The Shining Meets E.T. ; photo by Bruce Coulombe of Coulombe Enterprises
Marv Cosplay from Home Alone and Home Alone 2
Liar Liar Cosplay Comparison
Xena Cosplay Trio: Xena (@once_upon_a_khaleesi_cosplay), Joxer (Justin), and Callisto (@red_enchantress_cosplay); photo by Art By Sabina E
Bill and Ted wishes the Tardis was the phone booth they used for time travel...all those historical figures would have been able to fit with all the mystery space to spare.
#8 Meredith Mills is The Lost Princess Cosplay I can’t even begin to describe how excited I am to be bringing you my next Featured Cosplayer. They’ve been all terrific and eachRead More......
#7 Kat Caraway is Her Majesty Kat I was always on the hunt from the beginning to find someone who specializes in Disney princesses and I’m thrilled to present to you PrincessRead More......
#6 James Perkins of JP’s FX Creations Thought I’d mix things up a bit and do a little autobiography on myself to add to the list–just a bit arrogant to throw meRead More......
#5 Erica Melisandre is Red Enchantress Cosplay I know what you’re thinking…”that can’t possibly be her last name or is it?” No it isn’t, as I was gullible enough to ask–it’s herRead More......
#4 Justin Grubb of Turbo Time Cosplay One of my primary reasons for starting this page of Featured Cosplayers is to learn how I can become a good Cosplayer myself and I’mRead More......
This top ten was definitely coming to my blog as this is where it all started for me. The whole reason I moved to Florida and went to makeup school was my dream of becoming a SPFX makeup artist. All these films and the makeup artists that produced their work in them was complete inspiration for me to set goals for myself to lead me to today.
I may not be in the industry now, but the lessons I’ve learned and the skills I’ve acquired were a direct result of the passion for the craft. I’ve tried to recreate some of the makeups here and plan to do a few more to satisfy the “itch” or craving to make it happen and help answer the inquiry…”How in the world did they do that?”
There’s definitely a re-occurring theme with the makeups I chose as they tend to be more on the gory or horror side, so I’ll fair warn you if you can’t stomach these kinds of images. Vampires are also shown as a few examples as I love the mystery behind their myth. So without any further delay, here we go with my top ten movie makeups:
#10 Sloth From Goonies
Chunk and Sloth from the 1985 classic Goonies
“Hey you guys!” This movie just missed the cut as a top ten film of mine, but here it is making it in the makeup’s list as number 10. Sloth has my heart as a character and has my appreciation for his grotesque yet cool deformity. This masterpiece from 1985 is from the work of special effects wizard Craig Reardon. Foam latex ruled the 80’s in SPFX makeup and this was no exception. Several piece latex head appliance with blinking droopy eye and wiggling ears that were radio controlled (servo motors).
#9 Skinless Julia From Hellbound: Hellraiser II
Skinless Julia from Hellbound: Hellraiser II
They say the most complex and most beautiful form is the human body (inside and out) and I definitely agree. I loved this makeup and look so much I tried to do my own version for my final project in the makeup school I attended in Florida. The shock value is quickly masked by the incredible attention to detail and the believability of how it looks to see the flesh without skin. There are plenty of references in anatomy books how it looks, but with lifeless, colorless cadaver photos. To see it alive and vibrant is stunning to say the least. There was a large makeup crew for this film, but the credit is under the guise of Bob Keen and Image Animation who is also responsible for just about any film by Clive Barker.
#8 Legend (1985)
Legend favorite makeups: Darkness, Meg and Princess Lili Black wedding dress
I may have been able to make this top ten list longer since I couldn’t quite settle on just one makeup from this film…so I lumped three into one. I absolutely love this movie because the visuals are better than anything I can imagine, which still holds up to todays standards of computer enhancement. No computer help here, just raw foam latex, paint and powder. Rob Bottin and his crew are credited for all the incredible makeup effects. I knew there was something about this film that proved to me it’s worthiness as an elite choice and that is that it is a Ridley Scott film as I’ve already credited him twice in my top ten favorite films (Blade Runner, and The Gladiator).
#7 Interview With The Vampire
Vampire makeup from Interview With The Vampire
Okay, so I did it again…a collage of makeups from the same movie. It just makes sense when the makeup artist (Stan Winston) shows a noteworthy design performance throughout. The subtle undead pale, veiny vampire look is wonderful here. Costume design also played a role with the success of the look, but this will be addressed in another top ten on favorite costumes.
#6 Se7en 1995 (Sloth)
Sloth from 1995’s Seven
Rob Bottin strikes again for me on this list of favorite makeups. The intense studying and imagination to bring this makeup to life is incredible. I saw this film on the big screen and when the cadaver comes to life all the sudden and takes a last gasp and struggle to stay alive seared that moment in my psyche to this day. This could pass as a perfect zombie makeup as well. Once again I choose what a human form could be like at any given stage of life. Just the most perfect engineered machine in all the universe (in my opinion). This makeup was created just as silicone appliances were making it’s way into the effects scene, leaving foam latex to be used less in the higher budget tier of film making. Silicone has an amazing translucent quality that allows for flesh painting to look more believable as skin tones aren’t opaque in real life.
#5 American Werewolf in London (Transformation Scene) 1981
American actor David Naughton on the set of An American Werewolf in London, written and directed by John Landis. (Photo by Universal Pictures/Sunset Boulevard/Corbis via Getty Images)
Innovation can always play a roll in catapulting a film or idea to the forefront and the transformation scene from man to werewolf done by Rick Baker put him and the film in the spotlight as something like this has never been done before. It still is considered an incredible effect and is studied by film makers and aspiring makeup f/x artists today. Such a fun movie with humor, a love story and tragedy that sells the makeup or is it the makeup that sells the film.
#4 Dracula’s Brides From Francis Ford Coppola’s Film Bram Stoker’s Dracula 1992
Brides of Dracula from Francis Ford Coppola’s Bram Stoker’s Dracula 1992
I made another attempt during makeup school to try and recreate an image that I loved inspired by this look. Beauty and hypnotizing seduction comes across wonderfully in these makeups with another costume enhancing factor to bring these characters to life (or undead). This film won an Oscar for best makeup in 1992 and receiving the award was Greg Cannom, Michèle Burke, and Matthew W. Mungle.
#3 Return of the Living Dead III, Julie Walker as a Zombie
The character Julie Walker as a zombie in Return of the Living Dead III
A tragic love story and cool concept as Julie is brought back to life by her boyfriend as she becomes a zombie and struggles to not eat him. The way she attempts to curb her hunger is to constantly cut, stab, poke and maim herself to make the cravings go away through pain. An incredible study with wound type makeup; and again this is a makeup I tried to recreate. I actually found a girl who looked like her that agreed to be my subject…Thanks Jen! Steve Johnson is the makeup guru for this film.
#2 The Bride from Bride of Re-Animator (1989)
1989 Bride of Re-Animator
This makeup has some of everything that I listed above to make it a favorite from lifelike anatomy, undead beauty makeup, costuming and prop enhancement and a story or idea that makes it a terrific concept. Splicing body parts and organs together to make a complete whole person is not a new concept as in Mary Shelly’s Frankenstein, but a cool idea that makes for great cinematic entertainment. The masters of KNB Effects were responsible for this epic makeup job.
#1 Borg Queen from Star Trek: First Contact (1996)
Borg Queen from Star Trek: First Contact 1996
Surprise! Nothing like from above as a favorite, but just an all out absolutely gorgeous makeup. Imagination runs wild as you’re invited as a spectator and fan of the Trek series to try and understand how the Borg Queen is the way she is and not like the other Borgs that assimilate their subjects. When her upper quarter of her body with spine comes down and attaches to the torso, I was hooked. I’ve been staring at this makeup for years and just marveling at the paint job and clamp placement and effects. Michael and Monty Westmore known for the Star Trek Franchise and James MacKinnon and a host of others were the Makeup artists associated with this film.
My Makeup Tests From Favorite Film Makeups
Julie Walker from Return of the Living Dead III
Skinless study of Julia from Hellbound: Hellraiser 2
Dracula's Bride from Francis Ford Coppola's Bram Stoker's Dracula
Thanks for checking out another one of my “top ten” favorite lists. I definitely showed my age as the films I’ve chosen my favorite makeups are probably considered classics now, HA! Let me know what you think and comment below on some of your favorites.
Case molding as one example of the many different ways of preserving your masterpiece through molding
Molding 101: Preserving Your Creation
You may not realize this, but we deal with simple molding all the time in our daily lives, including the ice we put in our drinks which each piece of ice has been molded from the tray’s shape the water took as it was being frozen or to the cup cakes we eat that have been formed as the cake batter rose and fluffed in the oven inside it’s paper cup.
The mold process has been throughout history in human civilization with ancient weapons making when molten bronze was pored in a hollowed out sword shape out of stone; and even nature has produced some amazing natural molds with fossils embedded in rocks of extinct plants and animals.
Making a mold of your sculpture or object you need for your next project is the best way to preserve what you’ve captured and a way to be able to rapidly produce several pieces you need repeated multiple times over (i.e. scales, horns, spikes, or fake bullets).
I’ve used it as a way to be able to make armor out of a different/lighter material than what real metal armor would be or even to make what I need stronger and more durable than foam would be. And if any piece of a finished armor build breaks or doesn’t last, I have a mold to make another one without re-sculpting it.
Poor Molding
Poor mold for Borg Glove by Damaris Degen of Mystique’s world of Cosplay
Poor molding can be one of the fastest and easiest ways of making molds of your artwork or object you need mass produced. Typically the material used as the mold substrate is a liquid rubber such as silicone and/or a urethane based rubber. The liquid rubber starts off runny and by adding and mixing a said amount of catalyst or hardener is what makes it eventually become hardened flexible rubber.
The decision to make a poor mold is based on how simple and or symmetrical the shape of what it is your trying to mold is. For instance, if it has a flat surface to it and isn’t too tall or complex, glue it to a board, build some dam walls around it, spray mold release on the piece and then poor the mold.
A poor mold can be a little more complicated as a two part mold, meaning there is two halves to it as the piece to be molded is shaped and detailed all around as you’ll see in the galleries below. There you’ll find some tools and knives that I’ve made molds of for movie props made to be safer for stunt use.
The advantage with a rubber type mold is the flexibility to facilitate releasing a finished piece out and the incredible amount of detail it accurately captures after hardening. There is always the pesky air bubbles, however, that manages to find its way to hinder the process which I’ll be addressing a little later down the article.
Tools and Materials Typically Needed for Poor Molding
Darker than Black double blade being molded as a poor mold, double sided, pre-poor side one with channel key--clay walls
Completed double sided poor mold of Hei's double bladed knife from Darker than Black
Ready for production...finished poor mold of Darker than Black's double blade...two sided mold
Pre-poor of two types of poor molds; single stage and two sided (key channels) for accurate placement to minimize seam work
The two complete sides of a Fubar tool mold made by the poor mold technique
Circular saw blade of a single stage poor mold
Survival knife poor mold (double sided)
Brush Molding
Brush molding is for those projects that are just too big, round or uneven
Silicone brush mold for Skull Knight arm armor
shaped to be considered for a poor mold; whereas it would take way too much liquid rubber to complete a mold that was pored. Brush mold becomes smarter and more cost effective because of the control you have on where exactly the rubber goes and how thick.
There is one extra important step when building a brush mold where after the final layer of rubber is applied and hardened, and that is to make a hard (typically fiberglass) layer to the outside or on top of the last keyed rubber layer at the end to help hold/cradle the rubber to shape when the mold is empty. This is called a mother mold.
Tools and Materials Typically Needed for Brush Molding
Along with the tools used for poor molding, brush molding will add:
several disposable boar bristle chip brushes various sizes depending on scope of job – single use as each brush will harden as well
thickening agent for liquid rubber to help keep rubber in desired place and thickness to hinder drooping and “runny”
pre-made rubber keys to be added to last layer to help lock mother mold in place
It usually takes a minimum of three layers of brushed on mold material to acquire desired thickness. The first layer is brushed on as a skim coat without any thickening agent added so the thin material can get into any fine detail easily. The second, third, and any other layer has the added thickening agent mixed into the rubber to help hold the substrate in place without running off the piece.
Above, in the list, I mentioned keys to be apart of the last step in the liquid rubber phase of the mold. Keys are a button, or knob shaped mini protrusion from the mold to help locate exactly how the mother mold will fit every time the rubber is placed back into it’s cradle of the mother mold to define the shape as an empty mold.
keys are also a term used for a channel, button, or knob that will be part of the break wall if the mold is separated into two halves or more to help relocate exactly how the mold will fit back together again. The better the key system the less seam work to do on the casting.
Walls and key established for Berserker helmet brush mold
1st skim coat layer of Berserker brush mold out of silicone
Finished Silicone portion of brush mold for Berserker helmet, keys and walls established for the mother mold
Fiberglass Mother Mold Jacket For Brush Mold of Berserker helmet
Fiberglass casting from brush mold of Guts' Berserker helmet
1st layer of silicone for front half of Skull Knight breast plate armor brush mold.
Silicone brush mold of Skull Knight boot armor
Case Molding
Case molding is a more complicated way to make a mold, but done right will save on rubber material and give you better quality pulls with less finish work to the final casting. If done properly, it may preserve the mold longer and you can get more pieces out of it. It’s more complicated because of the many extra steps that are needed to complete the mold.
This type of molding has you working backwards a little where you actually finish the mother mold or outer shell first before any silicone is pored. Since this is just an introduction, I’ll just do a quick list of steps that are involved in making a case mold. I fully intend on doing a complete tutorial on how to make a successful case mold in the near future…but for now here’s a rundown:
Most important is make sure the original sculpture is fastened to the surface (pre-determined board) and NEVER MOVES THROUGHOUT THE ENTIRE PROCESS.
Protect the sculpture with plastic wrap/foil to help keep any clay residue from getting on the sculpture. If the sculpture is made of clay, be careful not to press hard against it as you work on the mold so you don’t damage any detail. I usually spray a couple layers of high gloss clear over the sculpture to help give it a “candy coating” mini shell for added protection and smoother surface that will show up in the casting.
Wrap the protected sculpture with at least a 3/8 inch thick layer of modeling clay including any keys that will be represented and any poor funnels at the top. Also, if the mold will be a two part mother mold, have a dividing wall with it’s own type of keys represented along the split point of the piece. (see pics below)
Cover the board and clay with wax or a good mold release.
Lay up the first half (or all if only one full shell needed) of the mother mold over top of the clay as a medium to thick layer of fiberglass or desired hard strong substrate and allow to harden completely. Create a flange on the board as well.
Lay up the second half after removing the clay or whatever you used to represent the dividing wall and waxing the first side that has hardened already creating a flange on the board as you did with the first half.
After the shell is done and you’ve waited a good while for the mother mold to cure completely, drill some registration holes and screw the hard flange of the mother mold to the board the whole mold is built on. This step is VERY important so you know exactly how to put this shell back over the sculpture without any of the 3/8 inch thick clay added earlier.
Remove the mother mold and then remove the 3/8 inch thick clay that was added earlier. This clay was there to represent the shape and space the liquid rubber was going to take up during the poring process.
Before placing the shell back over the sculpture, drill tiny (1/16″) holes in several strategic spots on the mother mold as vents, so you can see the liquid rubber fill and push air out through the shell. Relocate and place the shell back over the sculpture, that hasn’t moved, and secure the mother mold down tight on the board and screw or bolt the wall flange together if it’s a two part mold.
Mix the liquid rubber substrate according to the specs of the product. It is highly recommended that the liquid rubber is put through the process of removing air out that was forced in during the mixing process before poring into the mold. This is done with a vacuum pump and chamber. This is optional but desired for a stronger, cleaner and better mold.
Poor the mold material slowly and push clay over the 1/16″ holes as they begin to have the liquid substrate begin to seep out. In fact you can use clay to cover up any areas that may not have been well secured to prevent loss of mold material.
After the mold is filled to at least half way up the funnel spout, wait a full 24 hours or however long the product specs suggests for curing time before demolding everything.
Take it all apart and you may have to cut a sizable slit along any inconspicuous areas (the back) of the rubber to help remove it from the original sculpture. Don’t worry about the cutting as the rubber will relocate exactly where it needs to be with only a minor line showing as it sits back in the mother mold. Easy clean-up or finishing on the casting.
Now that you have a mold you shouldn’t have to worry about saving the sculpture unless it was a hard sculpt that could withstand the demolding process. Cast your pieces however you’d like (i.e. fiberglass, roto-cast resin, etc…)
Battlestar Galactica viper helmet clay sculpture, to be case molded
Viper helmet clay stage of case mold
Mother mold out of fiberglass for one half of shell
Viper helmet mother mold fiberglass second half of shell
Silicone rubber stage of viper helmet case mold
1st casting of viper helmet out of fiberglass from case mold
BSG Cylon head completed case mold
Hard Molds
Skull Knight shield hard mold, gel-coat and fiberglass
Hard molds, if cared for properly, can last a long time and withstand several more parts pulled out of the stiffer and stronger mold then it’s counter part as a flexible rubber mold. The rubber will break down over time, whereas the hard mold could last as long or longer then the maker attends it to.
My personal choice of material and kind of hard mold is the fiberglass mold. My experience has led me to believe the fiberglass mold is the most versatile and more widely used type of hard mold to be had. It’s strength, when thick enough, is uncanny and has countless uses and sizes for differing mold applications.
One famous type of fiberglass hard mold is with the manufacturing of medium and large boat hull fabrication. The hard mold will always keep its shape with minimal shrinkage and will last multiple parts pulled without losing any integrity if a consistent release agent is used each time.
One very important factor to be taken into account when deciding on a hard mold is that the sculpture or piece to be molded CANNOT have any undercuts or difficult shapes that fold over to create a “lock” making it impossible to demold a rigid piece from the hard mold, as the two (mold and plug) lock together.
Tools and Materials Needed for a Fiberglass Hard Mold
See pictures below for examples of fiberglass hard molds I’ve made in the past.
Skull Knight shield plug, foam, fiberglass, Bondo, and primer
Skull Knight shield hard mold, gel-coat and fiberglass
Berserk Dragonslayer, symmetrical half plug ready for molding
Dragonslayer hard mold Fiberglass and gel-cote (at least 1/4"thick)
Dragonslayer mold with reinforcement wood planks to keep mold straight
1st casting of Dragonslayer, fiberglass
Demolded 1st casting of Dragonslayer
Plaster Molds
Brush molding plaster of a clay sculpture
Plaster molds combine both the brush molding technique with the characteristic of a hard mold. It can also be pored as well, but most of my experience has been to brush mold to control air bubbles on the detailed surface for quality assurance.
Plaster molds are excellent for casting non-rigid materials in, like latex for mask making. The detail the plaster mold captures is remarkable and therefore transfers onto the casting for an amazing end product.
Tools and Materials Typically Used for Plaster Molds
burlap or long fiberglass strands – mixed in last layer for reinforcing and strengthening cement
disposable boar bristle chip brushes
large oven for baking finished mold to expel excess moisture
safety glasses
Vacuum Forming
Vacuum forming example
Vacuum forming is probably the least type of method used for mass production at home since it requires a system and/or machine that just isn’t economical or reasonable for personal use. However, if I had the room and funds, it would be a top ten purchase for me as I would invent uses just to have one–cause it is a fun thing to do.
Vacuum forming is, as it says, forming a sheet of a thin plastic type of material over an object of desired shape by use of heat and suction. The simpler the shape with no undercuts or “locks” the better. So, I would say that this type of molding is opposite of what one is used to, as the part to be kept from the mold is made on the outside of the plug. More like taking a skin from the shape that is desired.
The first thing that comes to my mind as a popular use for vacuum forming is with clone trooper armor and storm trooper armor. And my own experience with vacuum forming is when I had to make lenses for the Viper helmets I was making during my time with commission work.
Quickie, “Down and Dirty”, Simple and Cheap
I confess that I’ve used this method more times than I’ve should, but it’s just as effective with results and gets the job done with little cost at all. You can call this the disposable mold method, where the mold is just a one time use only.
The disposable mold type I’ve used the most is the “press” method. The press method is when you push a shape into clay and make an impression of the object you use to create the desired negative…(i.e. bolt head, half round, etc). You can press the shape as many times as you want side by side and produce a gang mold of several of the same shape if you need many castings of the same thing.
A good tip to know also, as a cheap simple method, is the use of clear silicone caulking as a substitute molding substrate. All you need to do to speed up the hardening is a shallow bucket of soapy water and inject the desired amount of caulk in it and mix it up in the water and apply quickly to the plug or piece to be molded–mold is done, add mother mold if needed. I’ve even used this method as a casting material for a fake, soft rubbery brain that I made using a pre-made jello mold.
I know there are other mold types I haven’t discussed here, but these are the most popular and the ones that I’ve used the most–so I hope you can take advantage of these methods and stay posted as I will do more detailed and elaborate instructions for each type in the Tutorials section here on my website. Thanks for hanging out…so until next time, happy crafting!
Side by side comparison of Henry Cavill’s Man of Steel vs my Cosplay
Becoming The Man Of Steel
So it took me long enough (about ten years) of being a cosmaker for other people, to then converting my skills to do actual cosplays for myself, and I’m excited to do one of my favorite comic book characters as one of my firsts. I loved the newer Superman design that has been portrayed since the 2013 release of The Man of Steel with Henry Cavill as Superman. The colors, the chainmail texture, the metallic muscle shading undertone and the “no external underwear” appearance.
Now I know I just said applying my skills, but I’m here to tell you I was just introduced to the other side of cosplaying that doesn’t involve the armor building I’ve been accustomed to. The different techniques were in changing my appearance drastically with body building, growing my hair out, changing my hair color and removing the gray, shaving off my goatee, filling in my eyebrows, anti-wrinkle cream, and the list goes on…
Once I decided to make it happen, the research on the best suit that I liked was on the hunt. Since I have no experience with textiles and sewing, this would be a costume that I would have custom made to my size. And the best Super suit in my opinion is from YoungKnight Props Studio.
Receiving The Super-suit
Measuring chart for custom suit fabrication
After contacting the maker of the suit, they e-mailed me a list of instructions on what they needed from me (besides the money of course) before they would start the suit. One option was if I were to get a muscle suit to be underneath the super-suit. I opted out of this because the cost of adding a muscle suit was nearly doubling the cost for the whole job. It would have been worth it, but I couldn’t afford it at the time and I’ve seen some examples without the muscle suit that looked really good as well.
The most important thing I had to do was measure my body specifically according to a measuring chart they provided in the email. I was to give measurements in centimeters which gave me the clue this costume would be coming from overseas. I also had to provide how long the cape needed to be to end at my ankles from the base of the back of the neck.
The waiting time for arrival was promised at 6-8 weeks, but it took a little longer since I ordered the suit to arrive before Halloween. I understood the delay completely since this is the busiest time of year for any costume maker.
Unpacking the super suit from YoungKnight Props Studio
Christmas came early for me as I received the suit on a Monday the day before Halloween. So the suit did come right before Halloween, but I knew there was a lot of work to do before it can be worn complete. All the trim/armor pieces made of urethane were to be superglued to the suit and it had to be done as I was wearing the suit since I don’t have a mannequin of myself, yet. (I fully intend to make one for myself for future cosplays).
I recruited my friend Dave (Thanks Dave!) to glue down most of the trim pieces that I couldn’t reach. Since I didn’t get the muscle suit, the trim pieces were from a mold of a muscle suited costume and, therefore, were too big for my body so the pieces were strategically cut to fit. There was an important, specific process recommended to do when supergluing the urethane pieces on. The parts and suit where the piece would be laid had to be primed first with this and then glued down with this.
The suit did not come with a hard under sole for my feet, so I had to provide my own foot protection for walking around in wearing the costume. I chose a size 12 woman’s thin sandals to be cut apart for the sole. Since I wear a size 13, a woman’s 12 would stay hidden or undetected under my foot after painting it red. The red paint I used was Rustoleum Sunrise Red gloss spray paint. It’s important to note that the surface that was to be glued was masked off so as to not have the paint cover any of the area where the adhesive was applied.
The cape was probably the easiest thing to attach as all I did was locate the proper placement of the cape to the suit and added a Velcro system. The Velcro on the suit was superglued the same way as the urethane trim pieces and the corresponding Velcro piece was hot glued to the cape material.
WIP Superman Cosplay
Woman's size 12 sandle to be converted to the under soul of the Man of Steel costume
Painting under souls for the Man of Steel costume
Finished soul superglued to costume
Velcro attachment for cape.
Changing My Normal Appearance
As I am getting up there in age, and I’ve always kept my hair buzzed cut and maintained a goatee, just putting on the Man of Steel Super-suit wouldn’t pass as a recognizable Superman. So I made some drastic changes to pull off a successful, but far from perfect cosplay. This was a six month process as I had to grow my hair out and work out regularly to get in shape and lose some weight.
As it came time to don the suit and do a photoshoot I had planned with Vicarious Cosplay for my write up on her in the Featured Cosplayers section to this site, here’s a list of extra things I did for my appearance:
coloring my hair to remove the aging gray evidence with product Just For Men dark brown.
getting my hair styled similar to the film’s (my hair still wasn’t long enough, though)
filling in empty (or bald) spots on my head with the product Toppik dark brown
temporarily eliminating my wrinkles with the product Plexaderm
Sucking in my gut, raising my ears and swallowing as a photo was being taken to reduce any sign of the droopy aging process…lol
These pictures were taken just 3 weeks apart from eachother
The Man of Steel Photoshoot with Photographer BriLan Imagery
Superman Cosplay; photo by BriLan Imagery
The Man of Steel cosplay; photo by BriLan Imagery
My Man of Steel Cosplay, suit by YoungKnight Props Studios; photo by Brilan Imagery
Clark Kent Cosplay; photo by Brilan Imagery
In and out of cosplay--Superman--James Perkins
Man of Steel over Metropolis; photo and edit by Brilan Imagery
Taking The Man of Steel to Holiday Matsuri 2018
Fun comparison to comic book where Poison Ivy successfully seduces Superman; picture taken at Holiday Matsuri 2018 with the amazing Alyson Tabbitha
Soon after the photoshoot with Vicarious Cosplay I got the chance to debut and test out my Super-suit at Holiday Matsuri 2018 at the Orlando World Marriot Center and I had an amazing time. This became one of my favorite cons I’ve ever been to because of the excitement of the people, the many terrific cosplays there and the Holiday atmosphere cause it’s no secret I love Christmas! The Hotel was decked out perfect for the season and parking was a breeze. Maybe parking was easy because I went early on the first day, Friday, but the line to receive an entry pass was incredibly long…even if one pre-paid.
I met so many incredible people and Cosplayers there and took several pictures to preserve the memories. I particularly tried to find DC Cosplayers to have my picture taken along side for a fun instant collaboration. My biggest highlight was meeting the great and sweet Alyson Tabbitha as she was a special guest invited to be there. In fact my primary reason for a Friday appearance was because Alyson was showing up that day in her epic Cosplay of Uma Thurman‘s Poison Ivy from Batman and Robin. I had a plan to have her help me re-create a theme from the Superman comics where Poison Ivy actually seduces Superman for awhile. She truly is a wonderful person to her fans and all those who want to meet her! I, of course, sounded and acted like a nervous goofball when it was my turn to get a picture with her. Perhaps one day I’ll get the opportunity to do an interview with her here for my Featured Cosplayers page.
One drawback to this costume, especially if I’m alone as I was at Holmat with no handler or friend, is that the zipper is in the back to get in and out of the suit, and it’s tight and form fitting, so if I need to use the restroom I would need help. I anticipated this as I stayed away from beverages until half way through the day and didn’t eat anything until I was ready to leave. I also preemptively took some immodium pills just incase (if you know what I mean…lol)
A Kryptonian Family Christmas; picture from Holiday Matsury 2018 with the lovely JessikuhSoup Cosplay
Picture time for these two popular DC heroes at Christmas time at Holiday Matsuri 2018 (Wonder Woman by Alyssa of @inelegantcosplay)
Holmat's secret security team...lol, (Purple Batgirl is Barbara of @russiamustang and Black Batgirl costume is from @cajetacraft)
Christmas time truce between Superman (me) and Catwoman (Jessica of @noble_porpoise), Poison Ivy (Delano of @akaana,ika), and Harley Quinn (Kylie of @deerest_kylie) from Holiday Matsuri 2018
Victoria of Vicarious Cosplay and I together again for this nice Christmas picture from Holiday Matsuri 2018 (Jessica Rabbit and The Man of Steel)
Soon I will be taking my suit to do an outdoor photoshoot to include action shots and recognizable poses from the comics and movies. As soon as this happens and I get the pictures back I’ll be posting a gallery of photos here, so stay tuned and thanks for reading.
The Man of Steel Outdoor Photoshoot by Photographer Melissa Blyth
DC Comics Lois Lane and Superman Cosplay; photo by Melissa Blyth
Lois and Clark Cosplay
Superman and Lois Cosplay; photo credit by Melissa Blyth
Superman with Lois, Cosplay by me and my wife, photographer Melissa Blyth
Superman cradling Lois, photo by Melissa Blyth
Superman and Lois Lane Cosplay, husband and wife team, photographer Melissa Blyth
Power couple, Lois and Clark
Superman with Lois Lane; photo by Melissa Blyth
Superman carrying Lois Lane
Superman on the steps of The Daily Planet
"Truth, justice, and the American way..." Superman Cosplay
DC Comics Man of Steel
My Superman Cosplay; photo by Melissa Blyth
Superman Costume
Superman in Metropolis
Superman landing in Metropolis; photo by Melissa Blyth
Palm trees in Metropolis?
Superman sighting in Florida
The Man of Steel taking off; photo by Melissa Blyth
Flight of superman
The Man of Steel
The Man of Steel taking off
Superman Cosplay, landing or taking off classic pose
Superman among the rubble...probably my favorite pic; photo by Melissa Blyth
Superman Cosplay outdoor shoot
The Man of Steel Cosplay rubble pic
Kalel on Earth
Outdoor photo shoot of my Man Of Steel Cosplay
Action pose for the Superman Cosplay
The Man of Steel Cosplay outdoor photo shoot;pic by Melissa Blyth
I am excited to introduce you to my next Featured Cosplayer here and she is no surprise to those who read my last write up on Khal of Atlantis. She is Victoria Amanda Bradley of Vicarious Cosplay and she is a true Gem! When meeting up with Pepe of Khal of Atlantis I was pleasantly surprised to find Victoria by his side as the two are a serious couple. And what a perfect match they make. More later on these two together, but for now I want to focus on the many wonderful attributes Victoria brings to the cosplay community.
Snow Buddies…Victoria in DC’s Killer Frost makeup with her “Fur-Baby” Kali
Let me just tell you right away that she loves what she does and has the biggest passion for the art of Cosplay more than anyone I have met before and I’ve been doing this for ten years now. Her zeal is infectious when being around her and I find myself wanting to do more and be more ambitious in the field just talking to her.
So you’ll be shocked to hear that she’s only been cosplaying for about a year and a half now from the time this article is published. I would have never guessed it by seeing the vast amount of quality, intelligent and fun examples of her work that she’s shared on her social media platforms and that I’ll be sharing here as well.
This girl is on fire and is non-stop, “pedal to the metal” achiever with plans I couldn’t ever imagine for myself. I’m sure it helps having a terrific cosplayer as a partner who she can feed off of, and as exciting as she is, I’m sure Pepe is getting motivated himself.
I’ve seen her passion first hand, not only by following her Instagram and Facebook pages, but when I invited Victoria and Pepe to dinner during my research on his interview. As I sat across the table from her, I watched as her eyes lit up whenever she told me about her experience at some of the Cons she went to and meeting and seeing some of the best influential cosplays like the incredible Lycans by @brenachs_props while she was sporting Selene from Underworld. And as she shared with me her future cosplays and upcoming events.
What can drive someone so much with this stuff?…’cause I love it, too, but I don’t have nearly the amount of energy and enthusiasm to cosplay as she does. Is it that it’s all brand new and exciting to learn for her or is it taking in all the many different worlds she imagines being in with a good cosplay? I do know one of the answers for sure and that’s the people she has gotten to meet and become dear friends with.
Friends That Cosplay Together…Stay Together
So I have a list of Cosplayers that I’ve compiled as the next ones I would like to feature here on my blog and the way I found them was by association with the previous Cosplayers I’ve wrote about here. The next few happen to be local for me here in Florida and they’ve all worked together before, which gave me the perfect opportunity to find out how special Victoria is to them or how they might know what makes her tick.
The common theme as these cosplayers answered me about her was how much of a Sweetheart she is and that they love how she totally gets into character especially with the little ones. I’ve also learned and seen for myself how she’s full of energy all the time and how much effort she puts into her costumes. Everyone I talked to also acknowledged how much charity work she does which is a way for her to give back and share the love.
I can tell you first hand how good of a friend she makes as she is genuinely interested in what and how I’m doing. She’s one of the only followers that responds to my stories on Instagram and cheers me on with what I’m working on.
Mera, Mera double the trouble...Seraphima 2846 and Vicarious Cosplay
Which lovely Ocean Lassie will win Aquaman's heart? Vicarious Cosplay and Seraphima 2846
Cosplay Queens Spiffied Up; Seraphima 2846 and Vicarious Cosplay
"When you cosplay together you're friends forever..." Victoria and her friend Jamie as Disney's Jasmine and Snow White
Bombshells spooking it out at Spooky Empire 2018...Victoria as Miss Argentina, Bri of Brirose Cosplay as The Corpse Bride, and Ariel of Air Potato cosplay as Poison Ivy
Me And Vicarious Cosplay At Spooky Empire 2018. Victoria's wonderful re-creation of Miss Argentina from Beetlejuice.
Just Go To The Source
It kind of sounds like I’m making her out to be a mystery when all I have to do is…well…ask her why she loves Cosplay so much. And that’s just what I did in the question, “What has Cosplay done for you?” This is what she said:
“Wow, cosplay has done so much for me. Right before I started cosplaying I was going through a divorce. I was down, maybe not depressed, but down. It helped me through the almost year long process. I have built so many friendships and relationships. It has even brought my family closer to me. It has even made my little brother and I closer. He has even asked me to make his first cosplay for him. Not to mention I found my soul mate. Without cosplaying I don’t think any of these things would have happened.”
“Tailor Made” To Be A Cosmaker
I like to give attention to my Cosplayers’ skills in crafting, building and cosmaking their costumes since that is where I have spent most of my time in the field and, therefore, I have a great appreciation to what goes into making a good Cosplay. There is so much I still need to learn and everyone has something to offer. Like Victoria is a terrific seamstress and tailor, which I have almost zero knowledge in sewing, but would love to remedy that. Her grandmother is credited for teaching her how to sew among other wonderful traits as she was raised by her. It’s important to note that Victoria can do much more like makeup, styling wigs, prop making, sculpting and molding.
Victoria's magic at work
From pattern to fancy dress
Material match for DC's Mera future cosplay
Ariel Bra fabrication
The making of a Beast...for Disney's Beast from Beauty and the Beast Cosplay.
Wig styling of Disney's Belle from Beauty and the Beast
Greta from Gremlins 2 ears built from scratch
Makeup FX
One question you’ll always find me asking as I add more of my favorite Cosplayers to my blog is what was in picking the alias or title name of your Cosplay persona? And Vicarious Cosplay is a real good one…here’s her explanation into why the name:
“I was having a hard time figuring out what I wanted my name to be and then I asked a couple friends what they thought and they gave me some suggestions and one of my friends stated that I should use vicarious, the reason being the definition of it is [experienced in the imagination through the feelings or actions of another person]. I thought this fit pretty well because it pretty much embodies what we do…as in Cosplay we pretty much divulge ourselves.”
So let’s get started with my favorite pics of Vicarious Cosplay put into multiple iconic categories:
Disney
Disney's Tinker Bell Cosplay; photo by BriLan Imagery
Tinker Bell's debut at DragonCon 2018
Captive/Slave Jasmine; photo taken at DragonCon2018 by Ethereal Vision Studio
Everyone's favorite mermaid Ariel
Fun shot at in an aquarium of Ariel Cosplay
Ariel on land Cosplay; photo by Dakota Bothun
Disney's Ariel (The Little Mermaid) cosplay; photo by Dakota Bothun
Walt Disney Animation Studios with Amblin Entertainment, Jessica Rabbit from Who Framed Roger Rabbit
Jessica Rabbit Cosplay
Victoria's Belle from Disney's Beauty and the Beast posing with Sleeping Beauty (Tracey from Lolley Lolley Cosplay) and Snow White
Disney's Atlantis Cosplay of Kida debut at DragonCon 2018 at the Georgia Aquarium.
DC Comics Cosplays
Mera Cosplay at DragonCon 2018; photo by Dan Ethan
Incredible underwater shot of Mera Cosplay; photo by Nathaly Calle of @justmomo.studio
Mera Cosplay; photo by BriLan Imagery
DC's Mera Cosplay; photo by Joe Tomasone
Killer Frost Cosplay for The Bombshells Cosplay Group; photo by Jeff Jenkins Photography
Killer Frost Selfie
Beautiful closeup of DC's Killer Frost Cosplay; phto by Ego Photos, Tampa
Batgirl Cosplay
Cat Woman Cruisin' in the Batmobile
Wonder Woman Cosplay; photo by Joe Tomasone
Wonder Woman 2.0
Marvel Comics Cosplays
Terrific action pose of X-Men’s classic Mystique from MegaCon 2018; photo by i Gael Carelli of Fright Lights Photography.
Classic X-Men comic Mystique "car selfie"...
Mystique makeup test film version.
Mystique transformation, photo and body paint by Steve Lebeda of Lebeda Photography
Mystique and Dark Phoenix Cosplay (Dark Phoenix cosplayer: Lauren Edinger @weyrwoman2218); photo and body paint by Steve Lebeda of Lebeda Photography
Elektra Cosplay
Marvel Comics Elektra Cosplay
Pepper Pots Cosplay for Costumers With a Cause charity event.
Selene From Underworld Cosplay
Underworld's Selene Cosplay; photo by Art Segovia Photography
Selene from Underworld Cosplay
That selfie taken in the hotel room just before the big Con reveal...taken at DragonCon 2017
Underworld action pose...a match made in Atlanta heaven (DragonCon 2017) Lycan by Richard B. Riddick of @brenachs_props
Selene Gets Her Trophy...DragonCon 2017
More Favorites From Vicarious Cosplay
Daenerys Cosplay from Game of Thrones; photo by Lauren Edinger of Lady Byrd Productions, LLC
Daenerys (Khaleesi) Cosplay from Game of Thrones; photo by Lauren Edinger of Lady Byrd Productions, LLC
Khaleesi (Daenerys), The Mother of Dragons Cosplay from Game of Thrones; photo by Lauren Edinger of Lady Byrd Productions, LLC
Yennefer from The Witcher cosplay; phot captured by Maile Lani Photography
Original Freddy Krueger gender bent Cosplay for Spooky Empire 2017
Original Greta from Gremlins 2 Cosplay for Spooky Empire 2017
Rita Skeeter Cosplay from Harry Potter Celebration at Universal Studios Orlando
Beautiful Beetlejuice gender bent cosplay car selfie
Not really a cosplay but a sweet fashion outfit for Spiffy Saturday at Universal Studios Orlando, Florida
Power Cosplay Couple
Khal of Atlantis with his Darling Vicarious Cosplay as Disney’s Jafar and princess Ariel for Costumers With a Cause Fourth of July Parade event.
If you catch a glimpse of one of these two at a con, chances are the other half is right there with him/her and you’ll be witnessing an Epic couple themed cosplay. These two have won several awards already and they’ve only been at it for only a year now from the date this is published.
It’s important to note, however, that each one can stand on their own with incredible individual cosplays and artistic talents. It may be tempting not to be able to think of one without the other, but as I’ve come to know them and ask about each of their lives, they certainly are their own unique person…which happens to compliment the other in a wonderful relationship.
They met at a Con of course, Spooky Empire 2017, Pepe as Predator and Victoria as Greta from Gremlins 2. The funny thing is they have been at some of the same events and in pictures together without really knowing eachother, but being Facebook friends as just “following a good fellow cosplayer.” She was drawn to his cool skull bandoleer as part of his Predator costume and was talking to a man in a mask. Later that night while saying goodbyes to other friends she saw him without the mask and they ended up hanging out together the next con day. Clues on mutual interest were being dropped throughout the day and at the end of the event she was the one who had to nudge him and ask him, “so when are you going to ask me for my number?”
For Pepe’s interview I asked Victoria to say how important she is to him and since this is my writeup on Vicarious Cosplay I asked him to tell me why she is important to him. This is what he said:
“She means the world to me, since the moment I saw her I felt the connection with her that I’ve never felt before. And now that feeling evolved into something more deep than love. There is not a single moment of the day that I don’t think about her. There is nothing brighter in my life than the light that she shines. I can positively say that I never met anyone like her. And my love and feelings will always shine.”
Get a load of these two:
Aquaman and Mera Couple Cosplay, photo by Brilan Imagery
DC Couple's cosplay of Aquaman and Mera; photo by Joe Tomasone of Tomasone Photography
Aquaman and Mera in there element; photo by underwater photographer Nathaly Calle of Just Momo Studios
Geralt and Yennefer from The Witcher couple cosplay
Pepe and Victoria's couple cosplay of Geralt and Triss from The Witcher
Geralt and Triss at a local renaissance fair
Khal and his Khalessi, Game of Thrones Cosplay; photo by Lauren Edinger of Ladybyrd Productions, LLC
Game of Thrones Cosplay; photo by Lauren Edinger of Ladybyrd Productions, LLC
Disney's Belle and the Beast for Kids Day 2018, CWC National charity event
Jafar and captive Jasmine cosplay duo
Disney's Jafar and slave Jasmine Cosplay; photo by Lauren Edinger of Ladybyrd Productions, LLC
Out Of Cosplay?
Abby from NCIS Cosplay…Channeling her inner Abby at work.
It’s hard for me to think of her out of cosplay sometimes since she’s so in-tuned to it and that most of what we ever talked about had everything to do with the craft. Plus I know she’s thinking about it all the time, because I know I am and she is way more passionate about it then me.
Not only does she have the coolest hobby in Cosplay, but she also has one of the coolest jobs that I could imagine and that’s a crime scene technician. Many things begin to become clear after learning this fact, like why she was drawn to Pepe in his Predator costume by noticing his real animal skull bandoleer before even seeing his face and some of the way she approaches her cosmaking. Which led me to the question that revealed her career…”What do you do for a living and do you use any of your skills and knowledge from work that helps you at all in cosplay?” This is what she said:
“My official title is a crime scene technician. My duties are to observe, document, collect and preserve the evidence while also providing my testimony if needed in court. Funny enough, I am attempting to try to make a face mold with the plaster we used to collect shoe and tire impressions. This is something I’ve been looking forward to doing within the next month or so. I plan on taking sand and putting it in a bin and pretty much faceplanting [my head] into it, setting it with hairspray and then casting it with dental stone.”
I’m jealous of the toys, materials and techniques she gets to deal with on a daily bases. I of course asked the stupid question that I already kind of knew the answer to and that is “Is your job anything like it is on the CSI TV shows?” A chuckle and then a… “No, however we did get the firearms training, but never really use it unless we go to the range.”
Pepe, their dog Kali, horror movies, trips to the theme parks with family and friends and charity events are just some of her favorite things to do outside of cosplay even though some of those things she would go full costume in as well. These tidbits of her life I learned just by catching her stories on Instagram which is always a treat to watch following her and Pepe.
A Heart of Gold
Victoria Bradley from Vicarious Cosplay cosplaying Disney’s Ariel Princess for a Costumers With A Cause Fourth of July event for kids
As talented as she is I believe I found something she is better at and more experienced in than Cosplay, which is her extensive work for charitable groups and her appearances at events where she can show her full support for. Which being a terrific Cosplayer can be a bonus as a way to put a smile on the faces of those who could use some sunshine.
A true humanitarian was a common theme from her friends as I asked them about her and as I have noticed myself. Some people would not want the attention as a charitable host, and even though Victoria doesn’t need the acknowledgement, she would readily share her experiences only to bring awareness to the multiple causes she supports. She’s so passionate about it and infectious that I’ll be asking her how I can get involved.
“As a Cosplayer for Costumers With a Causes I have had the honor of working with Make-A-Wish Foundation to make kids dream come true, Nathaniel’s Hope, fundraise for many charity organizations and done hospital visits just for those who are there at the moment. As a person out of cosplay, I have done charity with Habitat for Humanities and Ronald McDonald’s House. I am also an advisor for the Young Explorers program at my agency which is to teach those at a young age about law enforcement in crime scene which I have done numerous guest speaking at elementary schools to college. Before Cosplaying and when I was in college I did several fundraising for my chapter 4 cancer as well as Cystic Fibrosis.”
So Much More To Vicarious Cosplay
I can go on forever about her…so I will. Maybe not forever but for at least another segment here. If I had to describe her in one word I would say Magnetic…because you can’t help but be drawn to her with her lively spirit and zeal for life and Cosplay inparticular. I know she’s thinking about cosplay a lot and wonder if sometimes she looks at strangers walking by and thinks to herself…”OOH, I bet he/she could do a great cosplay of __________…”
In her short time as a serious Cosplayer she has been invited to be a DC Bombshell Model as you’ve seen above with her Killer Frost, she’s made countless friends in the community and I am honored that she calls me a friend, she’s met her soul mate in Pepe, helped put smiles on the faces of many children, and has learned some new and wonderful techniques to help improve her skills.
I always ask my Cosplayers what their dream cosplay would be and hers is incredibly ambitious and can’t wait to see and watch it happen. That cosplay is the Queen Alien from Aliens. I actually have a dream cosplay for her that when we very first met I messaged her super early in the morning the next day excited to tell her. Somehow I can see her as doing an incredible Mavis from Hotel Transylvania. I hope she’ll do it so I can see first hand or at least prove that I’m right…lol.
Our Shared Photo Shoot With Premier Cosplay Photographer BriLan Imagery
In and out of cosplay--Wonder Woman--Victoria Bradley
Epic shot of Victoria as Wonder Woman; photo by Brilan Imagery
Wonder Woman Cosplay by Vicarious Cosplay; photo taken by Brilan Imagery
Dianna Prince ready for her Wonder Woman duties; photo by BriLan Imagery
In and out of cosplay--Superman--James Perkins
Clark Kent Cosplay; photo by Brilan Imagery
My Man of Steel Cosplay, suit by YoungKnight Props Studios; photo by Brilan Imagery
Superman Cosplay; photo by BriLan Imagery
The Man of Steel cosplay; photo by BriLan Imagery
The infamous, fun selfie for a great Instagram story...done during photoshoot with Brilan Imagery
Beautiful touching scene of Superman carrying Wonder Woman to safety...photo and edit by Brilan Imagery
Wonder Woman vs Superman Cosplay; photo by BriLan Imagery
#8 Meredith Mills is The Lost Princess Cosplay I can’t even begin to describe how excited I am to be bringing you my next Featured Cosplayer. They’ve been all terrific and eachRead More......
#7 Kat Caraway is Her Majesty Kat I was always on the hunt from the beginning to find someone who specializes in Disney princesses and I’m thrilled to present to you PrincessRead More......
#6 James Perkins of JP’s FX Creations Thought I’d mix things up a bit and do a little autobiography on myself to add to the list–just a bit arrogant to throw meRead More......
#5 Erica Melisandre is Red Enchantress Cosplay I know what you’re thinking…”that can’t possibly be her last name or is it?” No it isn’t, as I was gullible enough to ask–it’s herRead More......
#4 Justin Grubb of Turbo Time Cosplay One of my primary reasons for starting this page of Featured Cosplayers is to learn how I can become a good Cosplayer myself and I’mRead More......
Pumpkin carving is easily the most popular or most practiced tradition for Halloween in my opinion. At least it is for my family and throughout my lifetime. The aroma of the fresh pumpkin after cutting into one and pulling out the pulp and seeds always brings me back to exciting memories of Fall and Halloween growing up. My mother would wash and bake the seeds to be snacked on while we carved our classic jack-o-lantern designs, to then be placed outside on our front porch for the spooky season. I grew up in northern Ohio so the cool weather allowed for early October decoration with the pumpkin art to last all month. Now that I live in Florida, carving a pumpkin has to happen nearest to the October 31st date to ensure that the pumpkin will not rot in the heat. They also need to be kept inside the air conditioning until just before Trick or Treating happens and then the jack-0-lanterns can come out to greet the eager candy hunters.
The Progression of My Pumpkin Designs
I’ve only just recently documented the last several years of my pumpkin carving, but I felt there is just enough to fill a post here for the Halloween Traditions page.
As much fun as I have doing them and as important as I felt the design would be, I would begin researching ideas starting in August. Some of the designs ended up being what my daughter wanted it to be as a little girl.
So here is a gallery collection of past Jack-O-Lanterns for Halloween:
Bats and puppy dog Jack-o-lanterns
Kitty Jack-o-lantern
Haunted house jack-o-lantern design
Murry the mummy from Hotel Transylvania jack-o-lantern
Owl in the moonlight Jack-o-lantern
Cheshire Cat from Alice in Wonderland Jack-o-lantern
Cartoon Frankenstein Jack-o-lantern
3D Pumpkin Carving
I was always impressed with the 3D pumpkin carvings/sculptures and since I’ve done many clay and foam sculptures in the past, it was only natural that I would attempt one of my own. So this year I was ambitious enough to try my first 3D pumpkin carving for Halloween. I chose the classic skull design and thought it would be neat to make a time lapse video of the progression. My daughter had fun editing the video with spooky music and the 70’s style film filter. (see video below)
First here is a picture gallery of the steps taken to achieve the skull coming out of the pumpkin:
Phase 1 of 3D pumpkin carving, tools used
Phase 2 of 3D pumpkin carving, removing outer skin and beginning design
Phase 3 of 3D pumpkin carving, bringing in the features
Phase 4 of 3D pumpkin carving, determining how thick and how far in sculpture can go
Phase 5 of 3D pumpkin carving, nearing completion
Phase 6 of 3D pumpkin carving, complete
Phase 7 of 3D pumpkin carving, light up Jack-o-lantern


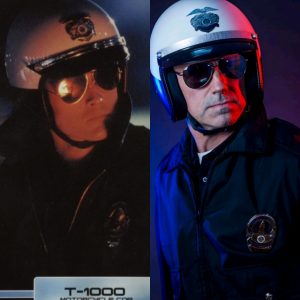


")


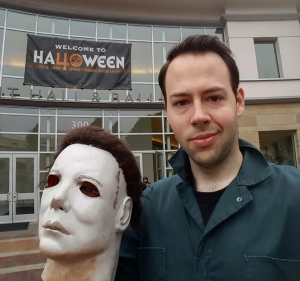

 at MegaCon 2017 and scores this epic pic in the DeLorean Time Machine")

 for his Terminator Cosplay from Tampa Bay Comicon 2017. Tech Noir background edited in by Justin.")


 from Batman the Animated Series voice actor, MegaCon 2016. Background edited by Justin.")
 and young Bruce Wayne (David Mazouz) at MegaCon 2018")


; photo by Joel Green of @onlineinternet")


, Anucksunamun (@once_upon_a_khaleesi_cosplay), Rick O'Connell (@turbo_time_cosplay), Evie (@red_enchantress_cosplay) Jonathan (@fictionalrealitycosplay) and Ardeth Bay (@khal_of_atlantis); photo by All Seeing Eye Photography (@all_seeing_eye_photography)")


, Kyle Reese (@fictionalrealitycosplay), Sarah Connor (@red_enchantress_cosplay), T-800 (@turbo_time_cosplay); photographed by TKirk Photos at Spooky Empire 2018")


 Jurassic Park Cosplay collaboration; photo by Kyle Roman of Dead FX Productions")


")


, Joxer (Justin), and Callisto (@red_enchantress_cosplay); photo by Art By Sabina E")


 for accurate placement to minimize seam work")


")


")


")
")
 and Catwoman (Jessica of @noble_porpoise), Poison Ivy (Delano of @akaana,ika), and Harley Quinn (Kylie of @deerest_kylie) from Holiday Matsuri 2018")
")


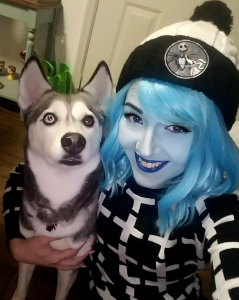


 cosplay; photo by Dakota Bothun")


 and Snow White")


; photo and body paint by Steve Lebeda of Lebeda Photography")


 Lycan by Richard B. Riddick of @brenachs_props")


 Cosplay from Game of Thrones; photo by Lauren Edinger of Lady Byrd Productions, LLC")
, The Mother of Dragons Cosplay from Game of Thrones; photo by Lauren Edinger of Lady Byrd Productions, LLC")


