Sculpting 101: Choosing What To Use For Your Masterpiece

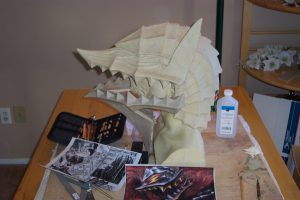
Berserker, Guts’ Armor clay sculpture

Sculpting 101: Choosing What To Use For Your Masterpiece


This post is an introduction to different media you can choose from to make your project.  I highlight mostly what I’ve used in the past and I’ll tell you now that there are many more different ways to “make an omelet” so I can’t say I’ve given you all the materials you can choose from.  I believe these ways are still the most popular so you will probably already have an understanding about what I’m talking about in each section.  The order of appearance down the list doesn’t reflect importance of use either.  You may also have an idea already what you want to use.

Modeling Clay

Oil based modeling clay is my preference for projects with great detail and jobs that will require molding for producing a rugged final piece.  Clay is easy to work with and you can quickly change shapes and texture with a push of your thumb.  A stiffer clay is designed for holding refined detail, where a softer clay for ease of making big shapes.  I usually go with the medium clay that has some properties of both.

If you are making a large sculpt, such as a helmet or a slender project with protrusions, an armature or structure is needed to wrap the clay around for stability.  Stability is not really needed for the large i.e. helmet sculpt, but taking up a lot of space on the inside of the mass will save on using a lot of clay.

Taking up space inside mass of large sculpt to save on clay and keep sculpt lighter in weight.

Wire armature for structure and stability.

I mentioned oil based here in the beginning because you can walk away from the sculpture for days at a time without worrying about the clay drying out or cracking like in water based clay.  My clay of choice that I use most often is Chavant NSP (non- sulfur-plasteline) medium. 

Tools needed:
  • Hands and fingers–80% of what you use on clay will be what you do with your bare hands.
  • Clay sculpting tool kit
  • Rolling pin
  • Rubber mallet
  • Various stiff sponges and rubber coarse stamps for pressing in texture detail
  • 90% isopropyl alcohol and stiff small brush for smoothing out finished sculpture


Super Sculpey

Various LOTR 1/8 scale trolls, last one on the right WIP Super Sculpey armor.

I’ve always known Super Sculpey to be a form of clay for statues and smaller scaled projects.  It’s advantage is after you’re done with your sculpture you bake it and it becomes hard which can be considered a finished project after painting.  It comes in several colors and if you get the beige and are sculpting a human form its color remains an almost near perfect shade of flesh after baking properly.  It also has different densities for detail sculptures.  Once baked hard you can also sand drill and tool it for further workability.

An armature applies here as well for a stable work piece.  Keep in mind you’ll be baking it so what you use has to handle the heat.  I’ve twisted aluminum foil together, with some wire, real tight as a type of armature and it works well to conduct the heat on the inside for real thick areas of Super Sculpey.

Tools needed:
  • Much of the same tools will be used here as in the modeling clay section above
  • Clay softener for Super Sculpey and small, stiff brush to smooth final details.

Aves Apoxie Sculpt


Aves Apoxie Sculpt is almost like duct tape with it’s many uses.  It is a two part equal mix that becomes harder to rock hard after 24 hours.  I haven’t done an entire sculpture in it yet, but I know some artists who prefer it to be the soul material for their piece.  I love it for it’s strength and workability after it hardens.  Ways that it can be used for varies from sculpting, bonding pieces together, filling in voids or holes, and even stopping leaks as it was originally designed as a plumber’s paste for water pipes.  It, like Super Sculpey above, can be sanded, carved, filed, and drilled after it becomes hard.

As you work with the material after mixing (follow directions how to mix on the containers) you’ll notice it will start to get warm from the chemical reaction, and it will feel  more and more stiff at different stages of the reaction. You’ll find you’re own preference of workability as time goes by.  It will hold detail a lot better as it gets closer and closer to becoming hard.  Simple water is used to smooth the surface.  I always have a cup of water with me while working with the stuff and continually wet my hands to prevent the material from sticking to my skin.  The Aves company recommends wearing gloves, but I personally can’t work with it wearing them.

Tools needed:
  • Much of the same tools will be used here as in the modeling clay section above
  • Water is used for smoothing substrate
  • Sand paper and files for after it becomes hard

EPS Foam


EPS (expandable poly styrene) or Styrofoam is another favorite of mine–except for the huge mess it leaves after carving.  If you have an extra large project to make, EPS foam is perfect because of how light and versatile it is to work with.  It can also be quite challenging as well.  You will be summoned to hone in a different set of sculpting skills than clay as with foam you’re taking material away or removing to get your shape.  Clay mostly requires you to add on and shape multiple building-up layers.  Imagine you’re Michelangelo chiseling away marble or stone from a huge slab to get a shape you see on the inside.

With foam you can cut, chop, saw, slice, chainsaw, file, sand, and even control melt/burn to achieve your desired output.  If you burn or cut foam with a hotwire or hot iron WEAR A MASK OR VENTILATOR!  The fumes are hazardous to breath in.  The advantage of being able to burn your cuts is that there is no foam bead mess.  It just melts to itself cleanly.

You’ll notice some of the pics for EPS foam above shows some examples with aluminum foil wrapping and sealing the finished foam form.  This is to protect the foam from the fiberglass resin that I coated it with to make a hard shell for molding purposes.  Foam has a few chemical enemies that immediately melt and pit the surface of the foam upon contact.

Tools needed:
  • Hand saw and/or keyhole saw
  • Utility knife, old kitchen knife, exacto blade
  • Depending on size or scope of project an electric chainsaw
  • Rasps, horse brush
  • Sandpaper coarse (40 grit) for shaping, fine (180 grit) for smooth finishing
  • Hotwire for burn cuts
  • Hot iron for large burn cuts or “hogging” out large sections

Urethane Foam


Urethane foam has a remarkable property that allows you to capture incredible sharp detail into your sculpture.  The cells are much closer together than in EPS foam and the beads and/or structure of the foam is finer.  This makes for easier cutting and tooling the surface.

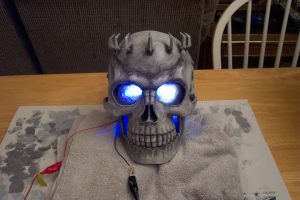
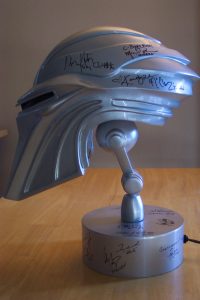
What I love most about this type of foam is that I can polyester resin coat my finished sculpture right on top of the foam without having a protective layer as you would for Styrofoam.  Having a tough “candy coating” shell helps protect the foam sculpture for the next step in the process.  For my cylon head, I then bondoed some of the line detail back in and then sprayed it with a high building polyester sandable primer to finish him off before molding.  Here he is getting ready for the molding process after a high gloss paint job:

Smooth “candy coated” shell over urethane sculpture before molding.

Tools needed:
  • Much of the same tools are needed as with EPS Foam
  • Dust mask required because of the tiny foam dust is hazardous to breath in


Eva Foam and Floor Mat Foam

Floor mat foam material for Tavion Cosplay by Damaris Degen of Mystiques World of Cosplay

If you’re a serious cosplayer, you should know all about EVA foam.  It’s the most popular choice for comfort because it’s so light and soft to wear–not to mention it’s incredible properties with flexibility to take any shape over body parts and holding details cut into it.  I’ve seen some wonderful armor builds that would fool almost anybody to believe it’s real armor.

One tip I learned that I found important is know your cut.  Another words cut out templates out of card stock or cardboard first and test fit on a form or yourself somehow and then transfer the correct shape onto the foam before cutting.  You’ll save time, money and head aches.

Hot glue is my choice of glue for connecting the foam to itself, plastic, and strapping.  However, a real cool affect I’ve used for armor builds is hammering large snaps to connect layers of armor together where the exposed snap looks like armor rivets.

Floor mat foam is a similar form of EVA foam and can be treated the same way for your builds.  The picture provided here for Eva and floor mat foam is from my friend Damaris Degen of Mystique’s World of Cosplay on her build for her Star Wars Tavion Cosplay.  I suggest following her because she’s fantastic, and keeps no secrets how she does her magic.

Tools needed:
  • All sharp cutting hand tools–scissors, utility knife, breakaway blade knives
  • Cutting board or hard smooth surface, straight edge guides
  • Dremmel tool for carving in details
  • Hot glue gun with hot glue sticks
  • Heat gun for shaping foam around contours (i.e. body parts…be careful, extremely HOT or do on a mannequin)
  • Rulers, tape measures, tailor tape measure
  • Plasti-Dip spray coating for giving the foam a hard candy coat finish when complete.
  • Body forms or mannequin

PVC Pipe, Shapes and Board (Sintra)

I have the greatest success with PVC shapes and boards for jobs that need a quick turnaround or projects that show me faster results and progress.  There are so many pre-fabricated shapes available in PVC such as all the different diameter pipes, plastic planters and bowls (which I used on my Life Size Nutcracker), and various thickness of PVC boards or sintra that is easy to cut.

I must confess that after starting to work at Vital Signs of Orlando, Inc I now have the advantage of a CNC router table for exact cut shapes out of sintra board, such as the clock arms and gears above pic.

Computer controlled cutting table

Tools needed:  

  • Hand saw, hack saw
  • PVC Cement for gluing pipes and/or layers of board together


Wood

I’m assuming that the first material ever used for 3D art was probably wood.  I’m also assuming most people, if you’re my age, had wood shop in middle/high school and got to make a bird house.  Everyone, I’m sure, has had some kind of experience with wood in their lifetime.  I like working with wood because there are so many tools made or invented just to deal with certain aspects of it by either cutting, filing, carving, drilling, gluing, screwing, and even staining and painting.

Wood is incredibly easy to manage with experience and has so many uses.  It is also readily accessible from many local sources such as Lowe’s, Home Depot, and Ace Hardware stores.

Looking at the gallery of photos above can give you an idea of how I have used wood before including using branches of a tree on my log reindeer.

I’ve learned a fascinating new technique since working at a sign shop which is sandblasting.  Here, the face of a cedar board gets sandblasted to get a desired woodgrain and custom signage.  Anything on the board that is to remain the surface of the original board gets a rubberized, tough, masking material that causes the sand to bounce off and not penetrate the surface of the board.  Anything not masked off gets pushed back and the beautiful woodgrain is exposed.  See sign pics above.

Compressor, sand, tanks, air hose, gloves, hood, and sand

Tools needed:

  • Manual hand or power saws (circular saw, jig-saw, chop saw, reciprocating saw, etc..)
  • Drills and drill bits, hole saws for use with drills and paddle bits
  • Files, chisels and sandpaper
  • Bar clamps and large vice-clamps
  • Wood glue
  • Planer
  • Wood lathe for spinning wooden dowel rods and filing specific shapes (i.e. baseball bat)
  • See above picture for sandblasting

Metal

Metal can be cumbersome because of it’s weight and difficulty in cutting, shaping and bringing together by welding if you don’t have the experience or the right tools.  But, nothing beats the real thing and I’m betting most replication in cosplaying armor and weapons or faux finishing is trying to copy metal’s appearance.

Some metals however can be easier to work with like aluminum and copper because they are lighter and softer.  Aluminum is my choice of metal that I have most experience with, which happens to be the choice of metal I use most often in my job as a sign fabricator.

The choice of metal for the fandom culture probably isn’t wise as a cosplay piece for safety reasons.  I can’t imagine wielding a real sword, at a Con, being Guts from Berserk manga as monstrous as his prop is.  But a real metal sword hanging on a wall with all your other collectibles and props is paramount.

Tools needed:
  • Metal cutting saw blades on power saws
  • Cutting torches (oxy-acetylene, plasma)
  • Wheel grinders
  • Welder-stick, mig, tig
  • Safety gear for heat and light (gloves, dark cutting shades and welding helmet)


Again, I haven’t shared everyway or everything you can use to build your projects from and if there is anything you believe important I left out with even talking about the materials highlighted here, please feel free to comment below and I will incorporate your ideas here.  Thanks for hanging out here for a while and good luck on your next project!  I’d love to see what some of you all are making and using to create your Masterpiece!


The Making of a “Die Hard” Star Wars Fan

Hasbro Vader, Battle Droid Blaster Rifle, Dark Horse Comic collection, badge, scrapbook, misc…

The Making of a “Die Hard” Star Wars Fan


Star Wars is KING!  Okay, so I know I’ve upset half the readers already.  I don’t necessarily believe that.  I’m a Battlestar Galactica guy as you can see from my previous blog posts.  However, I want to introduce you to a good friend of mine, Tim,  who believes Star Wars rules and after hearing him and the way he talks about theories, news, and obscure facts, I get excited and almost jump on the Star Wars train myself.

This is a blog post about, as the title says, the making of a “die hard” Star Wars fan. You’ll read and experience how he became a fan and how long his passion has been constant, maybe even grown with the excitement of the many installments and how vast the Star Wars Universe has grown as well.  I have hand picked much of the merchandise and collectibles shown in the images here, which is only about half of what he owns and shares with his boys.  I know there are a lot of serious collectors out there that may not be to impressed with what is shown here, but Tim is the kind of collector that doesn’t keep things on display in it’s original packaging anymore (he used to), but each piece in his collection has a specific memory and even a story that he connects to his life somehow.


So how big of a fan is he really?…you might ask.  Well, he never misses every Thursday nights installments of The Jedi Council on YouTube.  At his wedding he had the groomsmen march up the aisle first to the opening epilogue theme music right after In a galaxy far, far away…  He named his youngest Luke, and those who know him may debate if Luke is the biblical name, since he’s a man of faith, or the Star Wars Luke because of his zeal of the subject.  I’m gonna play it safe and say it’s a little bit of both.  He organized for me and several of our friends pre-sale tickets to the first showing of the last three films which was a day before their official release dates.  Now me, being a regular Con goer, just knew I had to make sure he would get the experience of a Star Wars Celebration adventure which was an experience he will never forget and also a new tradition he will never miss.  I know he can’t wait to take his boys with him next time. For one of his boys 5th birthday party he had an authentic life size working R2-D2 from the R2 builders Club rolling around the party with a 501st imperial officer and a non 501st, but well made, Sandtrooper cosplayer hanging out too.

R2-D2, R2 builders club

Is that red eye or light saber reflection in Tim’s eyes?

So how did it all get started?   In Tim’s words…”I became a fan when my dad took me and my brother to see ESB at the theatre as a young kid when it first came out.  At some point after that I watched ANH on television with commercials and then the regular format.  They re-released ESB to get us pumped up for “Revenge” of the Jedi later to be called Return of the Jedi.  So I went back to watch ep.5 again in the theater and then ROTJ.  I’ve watched these so many times I have lost count.  I’ve watched all six first episodes back to back all the way through in one day.  I’ve also watched all six all the way through with the commentary.  I kept going back to the theatres to see the digital re-mastered and new scenes for  4,5, and 6 right before they released the prequel trilogy (which ep 1,2, and 3 I didn’t enjoy as much).  3D was a must see for me also not long before Disney bought Lucasfilm.  Since ROTJ I’ve gone to all the films’ opening nights.  I’ve seen all of The Clone Wars cartoon and Rebels animation thus far.  I’m giddy with great anticipation for Solo: A Star Wars Story and ep.9.”

You can get a feel for Tim’s passion and a little more history of the foundation and connection he has to Star Wars in this video we shot together as I went through and picked out some of the non conventional merchandise not usually seen or talked about with other fans I’ve come across.

If you watched the video in it’s entirety you would have heard some of the questions I asked him like, …”Out of all the things in your collection, what would be your favorite?”  He surprised me with something that is new in his collection that his boys wrapped up for him for Christmas last year.  It was the sun shade for his car that features the cockpit scene in Episode IV with Han, Chewie, Luke and Obi wan. (…”that’s no moon…”).  He told an emotional story about losing his dad recently and seeing one of the exact same sun shades on the day his father passed and before he received his. Not telling anyone he liked it or even saw it–made it an amazing  coincidence, or some might say a sign, when he opened his on Christmas morning two days later.

Windshield sun shade from ep. 4 Millennium Falcon cockpit.

If I were to pick any favorite pieces from his collection after seeing and hearing about all of it I would have to say any of the toys that made sounds like the At-At, Millennium Falcoln, or Blasters.  Those sound effects and recorded dialogues took me immediately back to when I was a kid growing up and  the memories I had enjoying countless hours playing with these same toys and watching the movies.  Mine is the classic story of losing all my toys because my mom sold them at yard sale without my consent.

I found a fun questionnaire on Tumblr @thedisneyunderword that I’ve asked Tim to fill out for me and you can have fun coming up with your own answers as well.

1. Favourite Star Wars movie? (Episode 1-R1).  Tim: Episode V
2. Favourite Star Wars era?  Tim: Rebellion era
3 Favourite Star Wars trilogy? (Originals, Prequels, Sequels).  Tim: Originals
4. Jedi or Sith?  Tim: Jedi
5. Empire or Rebellion?  Tim: Rebellion
6. Bounty Hunter or Clone/Strom/First order Trooper?  Tim: Bounty Hunter
7. Rebels or Clone wars?  Tim:  Rebels
8. Favourite Star Wars book?  Tim: Heir to the Empire
9. Favourite Star Wars Comic?  Tim: Darth Vader #1
10. Favourite Star Wars game?  Tim: Star Wars Trivial Pursuit
11. Top 5 favourite female Jedi?  Tim: Mara Jade, Ashoka, Rey
12. Top 5 favourite male Jedi?  Tim: Luke, obi-wan, yoda, Kanan, Ezra
13. Top 5 favourite Bounty Hunters?  Tim: Boba, 4 LOM, ig88, bossk, cad bane
14. Top 5 favourite Sith?  Tim: Vader, palpatine, plagueis
15. Top 5 favourite Droids?  Tim: R2, 3po, k2so, bb8
16. Top 5 favourite Troopers?  Tim: Ct-7567, cc-3636, cc-5576-39, cc-2224
17. Top 5 favourite Senators?  Tim: Bail, the asogian
18. Top 5 favourite Republic/Rebellion ships.  Tim: x wing, y wing, b wing, a wing, cr70 corvette
19. Top 5 favourite Separatist/Imperial ships.  Tim: Shuttle from vi, Tie advanced X1, tie fighter, Devastator star destroyer
20. Top 5 favourite planets?  Tim: Hoth, bespin, kamino, takodana
21. Where would you live in the Star Wars universe?  Tim: Takodana
22. Who would you be in the Star Wars universe?  Tim: Episode VI Luke
23. What ship would you own?  Tim: the Falcon from IV
24. What Droid would you own?  Tim: R2
25. Would you have a team, or would you work alone?  Tim: Team
26. If you where a Jedi, would you be a Knight or a Master?  Tim: Master
27. If you where a Jedi Master, would you have a Padawan?  Tim: Yes
28. If you where a Sith, would you be the Master or Apprentice?  Tim: Master
29. If you where a Sith Lord, would you have an Apprentice?  Tim: No
30. Married, in a relationship, or single?  Tim: Married (as a Jedi Master)
31. Top 5 favourite species?  Tim: Human, snivvian, arcana, duros, kaminoan, bith, ithorians, gamorrean, sullustan, rodian, jawa, sand people/Tusken raiders
32. What species would you be?  Tim: Human
33. What species is your type?  Tim: Human, togruta
34. Who would your best friend be?  Tim: Han
35. Would you customise your ship?  Tim: No
36. Would you customise your Droid?  Tim: No
37. What colour skin/eyes would you have?  Tim: Brown/blue
38. If male, beard or no beard?  Tim: No beard
39. 1 lightsaber, 2 lightsabers, double lightsaber, or 2 double lightsabers?  Tim: 1
40. What colour would your lightsaber(s) be?  Tim: Kentucky Blue
41. If you’re a Bounty Hunter, what armour would you have?  Tim:  Mandalorian
42. Would you customise your armour?  Tim: Yes
43. What colour scheme would your armour/robes be?  Tim: Blend of KY Blue and black, charcoal, and grey
44. If you where a Droid, what Droid would you be?  Tim: K2so
45. What colour would your droid self be?  Tim: Charcoal
46. Pod racing or ship racing?  Tim: Ship
47. Space battle or ground battle??  Tim: Space
48. Would you have survived order 66?  Tim: Yes
49. Where would you go after order 66?  Tim: Jakku
50. What would you do after order 66?  Tim: Connect with rebel cells
51. Do you have any Star Wars Pop Vinyls?  Tim: No
52. Do you have any Star Wars collections?  Tim: Yes
53. Do you have any Star Wars art?  Tim: Yes
54. Do you create any Star Wars art?  Tim: No
55. Do you like/read any Legends/non canon stuff?  Tim: Not anymore
56. Top 5 favourite Legends character?  Tim: Was thrawn but now he is canon

57. Who is your Star Wars role model?  Tim: Obi-Wan
58. Top 5 saddest Star Wars deaths?  Tim:  Boba, Luke, solo, yoda, obi wan, anakin in vi
59. If you could bring any Star Wars character back to life who would it be?  Tim: Boba
60. If you found out the Star Wars universe was real, would you move there or stay here?  Tim: Stay
61. On a scale of 1-10 (1 being very little, 10 being an absolute know it all) how well do you know the Star Wars universe?  Tim: 7

Okay, I believe Tim is being humble or modest with that last question…I would rank him an 8 or 9 easy with the knowledge of the Star Wars Universe.  My knowledge is a dismal 5, which means I get the thrill of learning about this incredible story line.  So get ready Tim for a lot of questions from me.

I had a lot of fun working on this post with him and seen that he enjoyed it as well.  This will probably be an ever changing and growing post and topic because Tim already wants to introduce me to another fan and acquaintance of his that has an impressive display.  He’s already sent me some teaser pics so check back here often with updates.  Until then, May The Force Be With You!

Tim and James

Tim and I with his favorite piece in his collection…Sun shade ep. 4


Light It UP! Upgrade your Costumes and Props With LEDs

LEDs for lighting the eyes on Skull Knight.

Light It UP! Upgrade your Costumes and Props With LEDs


I love how cosplaying is getting more and more popular.  There hasn’t been a better time to be a fan of the comic/sci-fi/anime world then now.  I remember a time before the term “cosplay” was coined and one would have been considered a nerd or geek for going to a Star Trek convention in full uniform.  Now it’s all celebrated and very mainstream which could have some disadvantages, but the fun and excitement will always supersede.

So with the great competition–there’s no better way to succeed than to “Light It Up!”  If you’re costume calls for electronics–DO IT!  It’s somewhat simple and incredibly effective and will definitely turn heads.  We’ll also talk about how lights and electrical effects turns up the WOW factor for your collectible props display as well.

I’d like to start off featuring my favorite ensemble in my collection which is my Battlestar Galactica flight suit and Viper helmet, which both happen to have cool lighting effects.  The suit was made by Geoff Gay of Midwick Armory. He does an amazing job by using the same material the BSG production used on the show which makes his suits screen accurate.  The electronics for the suit is the O2 (oxygen sensor) on the left lower arm sleeve of the suit.  It’s a circuit board with 5 LEDs that can change color from green to red.  These circuit boards are made and provided to Geoff by Dana Gassar of Anovos Productions. They have a 3 stage pressure switch run by a 9V battery.

Viper Suit O2 Sensor LEDs by Dana Gassar of Anovos Productions

The Viper helmet, which is made by me, is a fiberglass reproduction from a mold and is painted with automotive paint and has a custom PETG plastic vacuum formed lens.  The helmet features two separate lighting systems, one inside the helmet and the two on the lower outside.  Both systems are turned on by the same switch, but have their own power source.  The two LEDs on the outside are run by a 9V battery and the inside forehead lights are run by it’s own 9V battery.  The internal forehead lights were purchased at Autozone.  Auto parts stores like Autozone and PEP Boys are a great source for all kinds of lights and electronics.


Next is the full armor Skull Knight costume I made which has a lighting effect with LEDs in the eyes.  I managed to strategically place the lighting so not to hinder the vision of the cosplayer inside.  Here I am at DragonCon 2011 where you can see the glowing effect in the eyes. This is a daylight shot, so you can imagine if the lights in the Marriot (where this pic was taken) were dimmed.

Isis (Damaris Degen of Mystiques World of Cosplay) and Skull Knight at DragonCon 2011

Lighting doesn’t have to be the sole enhancer to your outfit.  Sound effects is a good  way to surprise onlookers to get their attention.  I am always in awe when someone in  stormtrooper armor adds the voice box to their helmet, so when they talk it sounds just like the movie.

Before we get to lighting up props, there is one more quick electrical thing I’ve done before, which I highly recommend when wearing a helmet for an extended period of time, is putting in little fans or a cooling system.  It may not be noticeable for the crowds, but it will keep you marching on.

Miniature electronic fans for internal cooling.

Here is where we venture off into the world of props to give them a boost with lights in your collection.  The props I made that will be highlighted here are my 1:1 scale Cylon bust display with it’s sweeping red eye effect, 1:1 scale Guts Berserker armor helmet and decorative base from Berserk manga, and the 1:1 scale bust of Skull Knight from Berserk manga as well.

The Battlestar Galactica Cylon’s LED circuit board was made and provided to me by George from Timeslip Creations.  It’s run by 2 AA batteries and I had to convert it to run the switch down onto the base rather than the board.  I just used alligator clips connected to wire to run down the inside of the neck to a toggle switch at the back of the round base.


I put window tinting on a sheet of white copy paper and cut out the shape and stuck it to the back of the plexi glass lens to dissipate the lights so you don’t see the harsh definition of each LED.  It created a smooth sweeping effect.  My first attempt of the eye sweep before asking George to make the boards for me was I bought the Custom Dynamics Night Rider scanner lights.  It was an okay start and it looked cool, but it was way to fast and it looked like the Cylon was on steroids.

Knight Rider scanner bar. Too fast for Cylon.

Lieutenant Margaret “Racetrack” Edmondson played by Leah Cairns photo-op MegaCon 2008

The Berserk prop entry of the Berserker Armor and Skull Knight bust was a carefully well thought out collaboration with a friend I’ve come to know through these projects.  His name is Derek and I talked about him a little on the Home page.  He is the moderator of the Berserk merchandise at skullnight.net forum.  We turned the project into multiple runs (about 30) for fans of the manga to purchase.  Derek was the driving force and designer of these pieces including what to do with the lighting.

For Guts Berserker helmet I used the same style of lights I used on the inside of the viper helmet for the “Z” shaped eyes.  For the base I found a nice little gem of a small circuit board with red LEDs that had seven different action settings.

Guts Berserker Armor Bust Display with red LEDs and pulsating circuit board LEDs on base

Guts Berserker Armor Bust Display with red LEDs


Skull Knight was a little more complicated with the small space I had to work with inside the skull and I had to cover any gaps or voids in the helmet skull so the light would only penetrate through the eyes.  I just hot glued black jersey material from behind, inside the head where the light shined through.  The switch for Skull Knight to turn on the lights is located right behind the inside back of the chin so I didn’t have to run any wires down to the base.  All the electronics are localized in the skull.


So if either you have an awe inspiring costuming impression or a prop room display that you and your guests want to hang out in all day it will be because of the extra effort you put in by adding lighting and electronics.  This can be a great tribute to the fandom culture by representing what you are mimicking with complete accuracy and detail.

Thanks for hanging out here for a little while and I intend on doing complete tutorials on hooking up LEDs to batteries, resistors and switches in the near future so keep a look out here for updates.

ENJOY planning your next adventure!


Enhancing Your Costume With Prop Weapons

Resin stunt blaster from a kit painted

Enhancing Your Costume With Prop Weapons


I know what you’re thinking, “DAH–No Kidding! Of course I’m using props to go along with my getup!” In fact I would venture to say the weapon is probably the first thing finished or obtained before the costume is ready for showing off. This entry is about different ways to make and use your prop weapon as a way to save money and keep it light and safe, but also looking great.  Not every weapon here is done by me. I’ve asked a couple of talented artists I know if I can feature their work here because what they did looks great and they kept it on a low budget.

One of the quickest and least expensive ways to get your weapon is to buy the toy and paint it to look real.  My friend and terrific cosplayer Damaris Degen of Mystique’s World of Cosplay has done exactly this with the Hasbro Han Solo Blaster.

Spray painted base coat.

Spray paint base, dry brush detail.


It’s amazing what spray paint and some dry brushing can do.  She even took the time to drill out the many small holes on the flash hider at the end of the barrel giving it a more authentic look.  Great Job Damaris!

Along the same idea as buying the form and then painting is purchasing an airsoft rifle or gun which is what I did for DragonCon one year.  I got the airsoft to go with my viper suit in combat mode for the parade with The Colonial Fleet. It was an incredibly easy paint job because it was already black.  I just dry brushed some silver highlights to make it look metallic and not plastic.  Both the toy and the airsoft are light weight so carrying them around all day is a breeze.

Airsoft Rifle from eBay silver highlights painted for realism.

Building your weapon from scratch is not as easy, but it is very rewarding and a lot of fun. The challenge is to find the right materials at the right price. Here is an example of an accessory my friend made for his son for Halloween.  This is how he described

Leather strapped PVC handle and Foam floor mat head.

the process of fabricating it: “I drew the axe head pattern on a large sheet of paper and cut it out. I then traced it onto foam floor mat and flipped the pattern and traced it onto another piece of foam floor mat so I had two halves of the axe to sandwich the PVC handle between.  I then glued them together with contact cement.  I used a dremmel tool to shape the axe blade and pick. I wrapped the handle to look like a leather grip. The foam head was sealed with two layers of modge podge and then spray painted the whole thing black.  Then I dry brushed the metal parts with silver paint, painted brown over the leather parts and dry brushed a lighter brown on the leather.” Thanks Jack…looks great!

Much of my work, however, was not so easy.  Some how, I seam to end up doing things the hard and expensive way, but the pieces I’ve made are durable and can be made again because I make molds for about everything I produce.  Having a mold means you could make several and you can experiment with casting in different materials.  Fiberglass,  pour resin casting, or foam are usually the choices of media to manufacture in.

It is a long withstanding or known rule that when bringing a prop firearm with you to a Comic Convention that you paint the tip red or orange for easy visibility to let Con folk and staff know that your piece is fake or harmless.

Airsoft rifle

I hope that this may have been a little inspiring for you to get motivated and be thinking and executing your plans for the next convention you’ll be attending.  Prop weapons are a must and there is nothing like posing for pics by excited Con guests wishing that they had a cool prop to go with their costume.


Get It Signed! Boost Your Prop’s and Collectible’s Value With Autographs

Signatures on Cylon Bust Display

Get It Signed! Boost Your Prop’s and Collectible’s Value With Autographs


The best conversation piece in my collection is my 1:1 scale Cylon bust display I made from the reimagined series of Battlestar Galactica. It’s popular because of my effort to get it signed by as many cast members from the show as I could.  I’m now only missing two autographs that would satisfy my endeavor (Grace Park and Lucy Lawless).  For me the value I posses is in sentiment and not really monetary which are the two different types of value one would attempt by having their piece signed.

Kara “Starbuck” Thrace played by Katee Sackhoff signing a Viper helmet I made for a client

If your goals are monetary value and you plan on selling it I would suggest just the signature without a personalized message on the piece like “To a special fan…” or “Best Wishes ____________”.  The sentimental approach, however, means it stays with you always and you’ll probably pass it down to someone special much later on who will appreciate it.  Both ways are a great and fun way to enhance your collection.

Just getting your desired paraphernalia autographed isn’t enough anymore without getting a letter or proof of authenticity. There is a flooded market for comics and collectibles and a signature can easily be forged, so buyers want the proof.  No sweat, every Con I’ve been to had a booth and offered a service for a letter of authenticity for about $20.00. That’s not cheap, though, especially if you add in the cost of the autograph that you had to pay for.  I’ve seen the price of an autograph be from $20.00 to $250.00.

Personally, for me, I didn’t take the approach of the proof of authenticity.  My proof is with the photos I managed to take of the actors signing or posing with me and my prop.  Good photos can be printed out and displayed on the shelf with the collection.  Leah Cairns will always have a special place with me because she was the first to sign my bust.  She was so impressed with it that I offered to make one for her and she has one too now.  She ended up doing exactly what we’re talking about now, which is getting it signed, when she took her bust on the set with her in the last days of the series and had her cast and crew friends sign it.

Leah’s Cylon Head I made for her when she took it on set during the last days of filming to get her cast friends to sign

Lieutenant Margaret “Racetrack” Edmondson played by Leah Cairns photo-op MegaCon 2008

Leah’s Cylon Head I made for her when she took it on set during the last days of filming to get her cast friends to sign

One last suggestion would be to always have a good black sharpee with you even though the actors always have several on hand with the many head and set shot photos to choose from at their table. Having a sharpee prepares you for a possible lucky encounter at a Con if you bump in to a famous guest in an elevator and they oblige in signing incognito.  Don’t forget to get a pick as proof!


My Goals For Producing This Blog

Sculpting cylon head in foam

My Goals For Producing This Blog


Case Molding

Before I finally decided to write a blog I was always toiling on the how, what and why to write about or what to say that people would actually want to come here.  I have been active in the past on some great forums on props and statues like therpf.com.

I would get many positive responses on my work and many questions on how I did several projects and the steps I took in getting to the finished product.  I was happy to offer any answers at anytime–no secrets here.  Then it dawned on me to just start a website and blog that would showcase my large body of work and continual projects.

So my goal is to offer future posts giving tutorials on molding techniques, sculpting tips and the different media like clay and foam to make your masterpiece from, casting materials like fiberglass or urethane plastic and painting recommendations.

Makeup and special makeup effects (spfx) was my first passion so you bet I’ll be talking about it and offering resources, and believe it or not, beauty makeup advice. Beauty was the first requirement I had to learn in the makeup school I went to at The Joe Blasco School of Makeup Orlando Facility.

At The Joe Blascoe Makeup Training Facility, Orlando

Final project in makeup school inspired by Hellraiser.

I’ve always had the passion for holiday decorating particularly Christmas (and, yes, Halloween) and since the inception of Pinterest to the internet I found myself hovering there for hours on end getting ideas and coming up with my own pins.  So future blogs will be pinned there of tutorials on my Life Size Nutcracker and other Christmas decorations I conjure up and future Jack-O-Lanterns I carve.

In conclusion, I’m not really selling anything here, but perhaps a final goal can be to write a few eBooks on mold making, sculpting and casting once I drum up enough blog posts on the subjects.

Until next time, I hope you enjoy browsing here for a while and feel free to contact me with any queries you may have. Bye!